spout

July 8, 2014 spout

Moving My Site to Azure: ASP.NET MVC 2

Moving My Site to Azure: ASP.NET MVC 2

In our last episode, I talked about the joy and wonder that is moving my site’s ISP-hosted SQL Server instance to SQL Azure. Once I had the data moved over and the site flipped to using the new database, I needed to move the site itself over, which brought joy and wonder all it’s own.

Moving to Visual Studio 2013

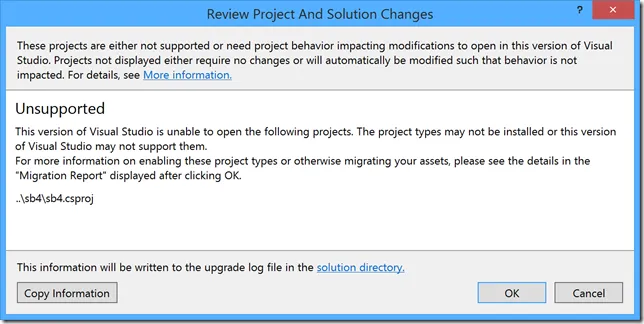
I haven’t had to do any major updates to my site since 2010 using Visual Studio 2010. At that time, the state of the art was ASP.NET MVC 2 and Entity Framework 4, which is what I used. And the combination was a pleasant experience, letting me rebuild my site from scratch quickly and producing a site that ran like the wind. In fact, it still runs like the wind. Unfortunately, Visual Studio 2012 stopped supporting MVC 2 (and no surprise, Visual Studio 2013 didn’t add MVC 2 support back). When I tried to load my web site project into Visual Studio 2013, it complained:

image

This version of Visual Studio is unable to open the following projects


This error message lets me know that there’s a problem and the migration report provides a handy link to upgrade from MVC 2 to MVC 3. The steps aren’t too bad and there’s even a tool to help, but had I followed them, loading the new MVC 3 version of my project into Visual Studio 2013 would’ve given me another error with another migration report and a link to another web page, this time helping me move from MVC 3 to MVC 4 because VS2013 doesn’t support MVC 3, either. And so now I’m thinking, halfway up to my elbows in the move to MVC 3 that Visual Studio 2013 doesn’t like, that maybe there’s another way.

It’s not that there aren’t benefits to move to MVC 4, but that’s not even the latest version. In fact, Microsoft is currently working on two versions of ASP.NET, ASP.NET MVC 5 and ASP.NET v.Next. Even if I do move my site forward two version of MVC, I’ll still be two versions behind. Of course, the new versions have new tools and new features and can walk my dog for me, but by dropping old versions on the floor, I’d left with the choices of running old versions of Visual Studio side-by-side with new ones, upgrading to new versions of MVC just to run the latest version of VS (even if I don’t need any of the new MVC features) or saying screw it” and just re-writing my web site from scratch. This last option might seem like what Microsoft wants me to do so that they can stop supporting the old versions of MVC, but what’s to stop me from moving to AWS, Linux and Node instead of to ASP.NET v.Next? The real danger of dropping the old versions on the floor; not that I’ll move over to another platform, because I’m an Microsoft fanboy and my MSDN Subscription gives me the OS and the tools for free, but that large paying customers say screw it” and move their web sites to something that their tools are going to support for more than a few years.

Luckily for me, there is another way: I can cheat. It turns out that if I want to load my MVC 2 project inside of Visual Studio 2013, all I have to do is remove a GUID from the csproj file inside the ProjectTypeGuids element. The GUID in question is listed on step 9 of Microsoft’s guide for upgrading from MVC 2 to MVC 3:

image

Removing {F85E285D-A4E0-4152-9332-AB1D724D3325} from your MVC 2 project so it will load in Visual Studio 2013


By removing this GUID, I give up some of the productivity tools inside Visual Studio, like easily adding a new controller. However, I’m familiar enough with MVC 2 that I no longer need those tools and being able to actually load my project into the latest version of Visual Studio is more than worth it. Andrew Steele provides more details about this hack in his most excellent StackOverflow post.

Now, to get my MVC 2 project to actually build and run, I needed a copy of the MVC 2 assemblies, which I got from NuGet:

image

Adding the MVC 2 NuGet package to my project inside Visual Studio 2013


With these changes, I could build my MVC 2 project inside Visual Studio 2013 and run on my local box against my SQL Azure instance. Now I just need to get it up on Azure.

Moving to Azure

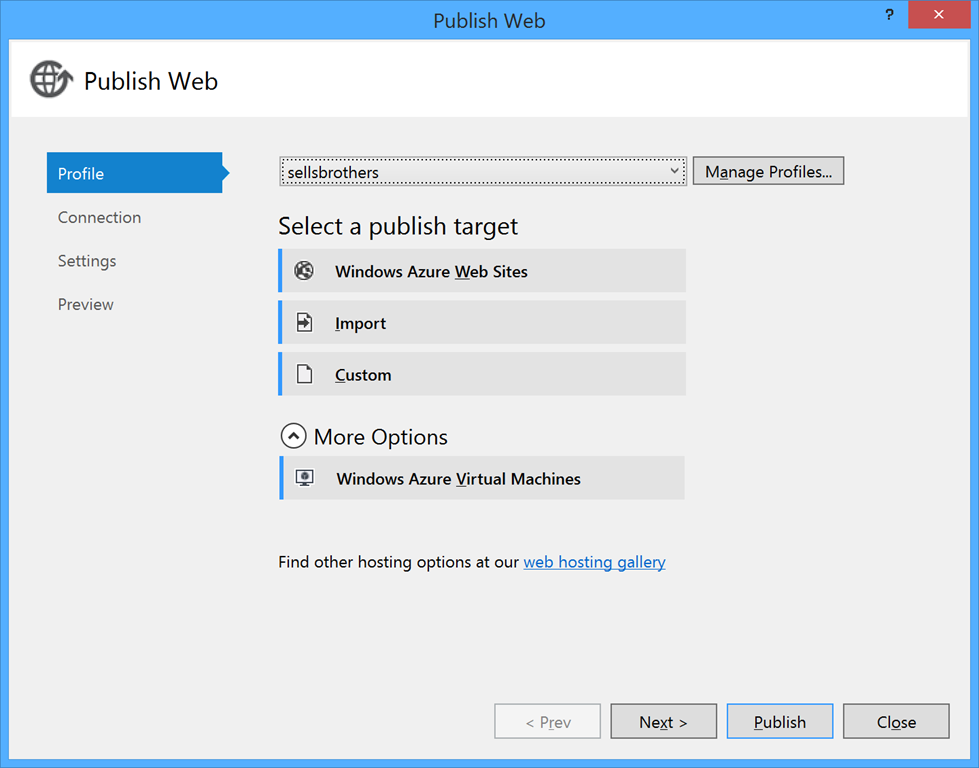
Publishing my MVC 2 site to Azure was matter of right-clicking on my project and choosing the Publish option:

image

Publishing a web site to Azure using the Solution Explorer’s Publish option inside Visual Studio 2013


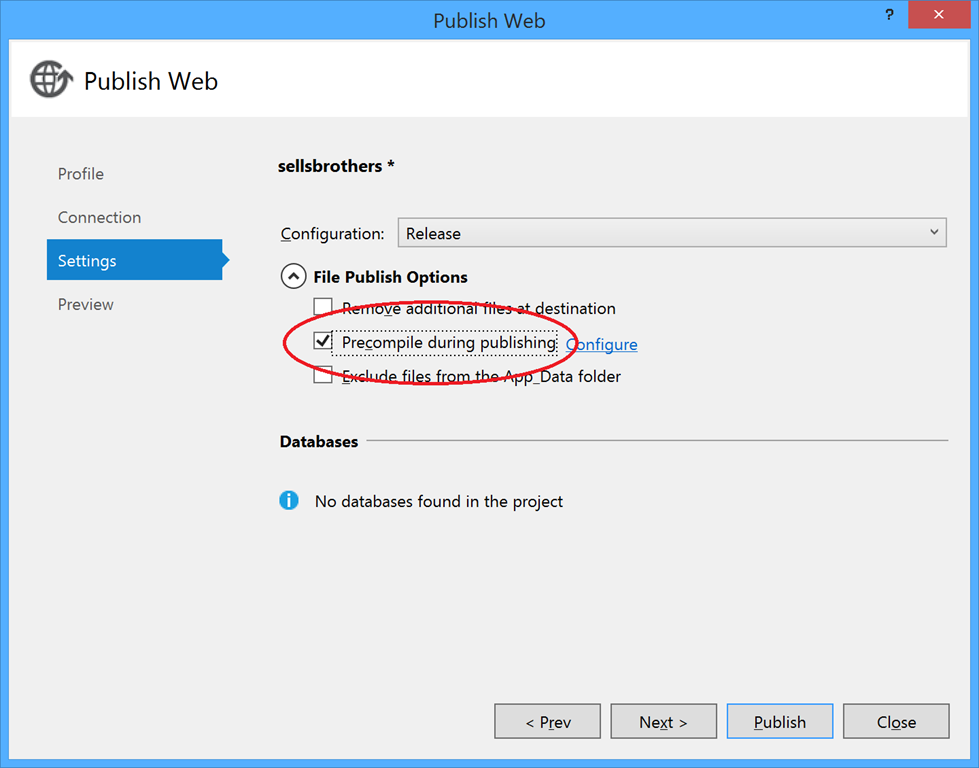
Selecting the Windows Azure Web Sites as the target and filling in the appropriate credentials was all it took to get my site running on Azure. I did some battle with the Error to use a section registered as allowDefinition=‘MachineToApplication’ beyond application level bug in Visual Studio, but the only real issue I had was that Azure seemed to need the Precompile during publishing” option set or it wasn’t able to run my MVC 2 views when I surfed to them:


image

Setting the Precompile during publishing” option for Azure to run my MVC 2 views


With that setting in place, my Azure site just ran at the Azure URL I had requested: http://sellsbrothers.azurewebsites.net.

Where are we?

I’m a fan of the direction of ASP.NET v.Next. The order of magnitude reduction in working set, the open source development and the use of NuGet to designate pieces of the framework that you want are all great things. My objection is that I don’t want to be forced to move forward to new versions of a framework if I don’t need the features. If I am forced, then that’s just churn in working code that’s bound to introduce bugs.

Tune in next time and we’ll discuss the fun I had configuring the DNS settings to make Azure the destination for sellsbrothers.com and to add SSL to enable secure login for posting articles via AtomPub and Windows Live Writer.

July 7, 2014 spout

Moving My Site to Azure: The Database

Moving My Site to Azure: The Database

In a world where the cloud is not longer the wave of the future, but the reality of the present, it seems pretty clear that it’s time to move sellsbrothers.com from my free ISP hosting (thanks securewebs.com!) to the cloud, specially Microsoft’s Azure. Of course, I’ve had an Azure account since its inception, but there has been lots of work to streamline the Azure development process in the last two years, so now should be the ideal time to jump in and see how blue the waters really are.

As with any modern web property, I’ve got three tiers: presentation, service and database. Since the presentation tier uses server-side generated UI and it’s implementation is bundled together with the service tier, there are two big pieces to move — the ASP.NET site implementation and the SQL Server database instance. I decided to move the database first with the idea that once I got it hosted on Azure, I can simply flip the connection string to point the existing site to the new instance while I was doing the work to move the site separately.

Deploy Database To Windows Azure SQL Database from SSMS

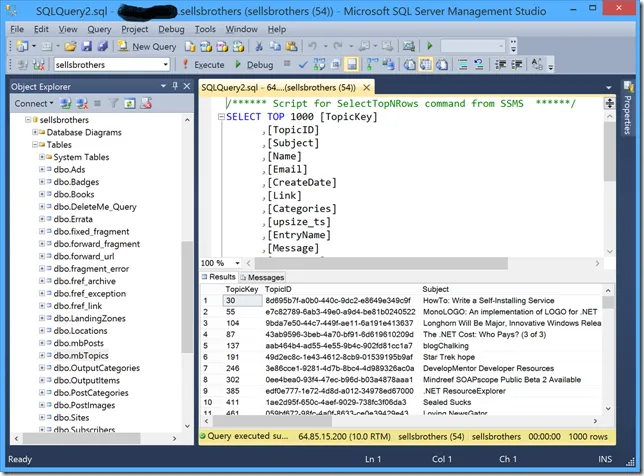
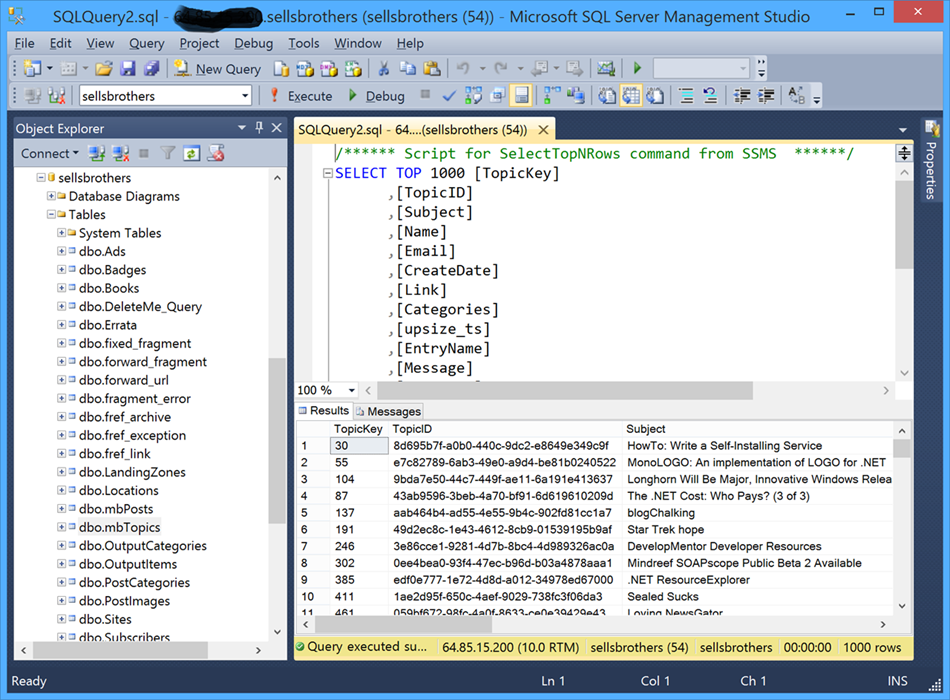
The database for my site does what you’d expect — it keeps track of the posts I make (like this one), the images that go along with each post, the comments that people make on each post, the writing and talks I give (shown on the writing page), book errata, some details about the navigation of the site, etc. In SQL Server Management Studio (SSMS), it looks pretty much like you’d expect:

image

sellsbrothers.com loaded into SQL Server Management Studio


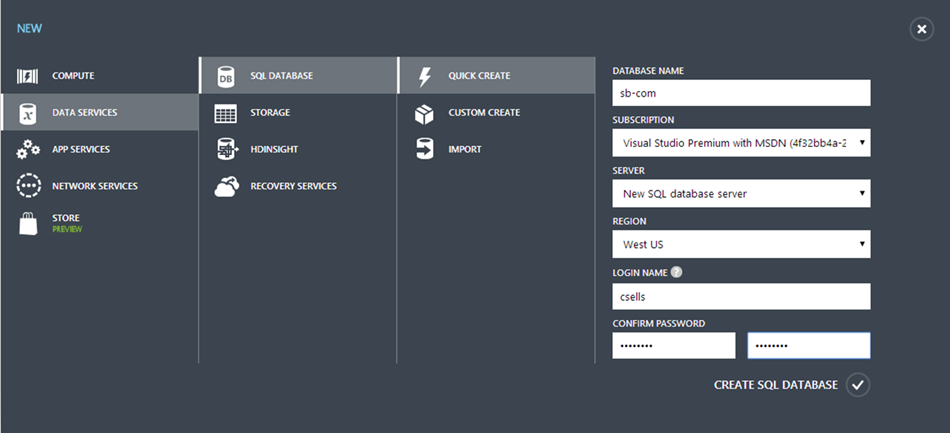
However, before moving to Azure SQL Server, I needed a SQL Azure instance to move the data to, so I fired up the Azure portal and created one:

image

Creating a new SQL Azure database


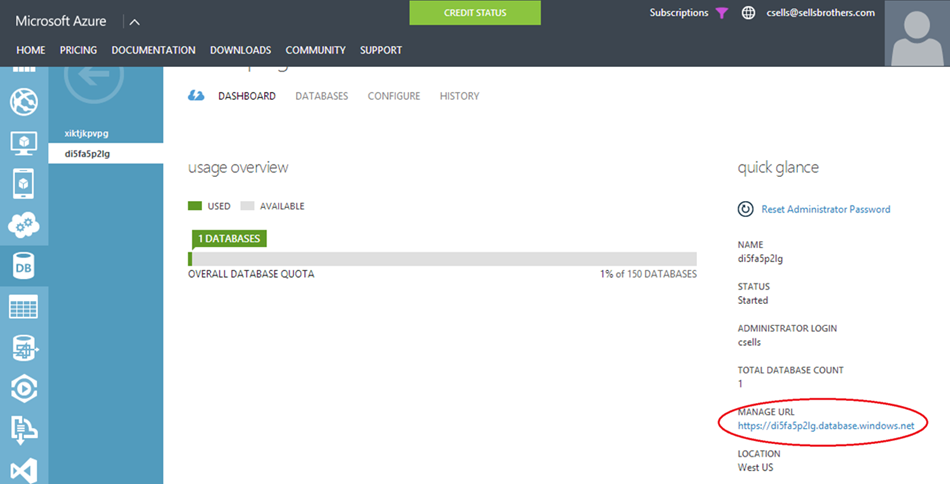
In this case, I chose to create a new SQL Azure instance on a new machine, which Azure will spin up for us in a minute of two (and hence the wonder and beauty that is the cloud). I choose the Quick Create option instead of the Import option because the Import option required me to provide a .bacpac file, which was something I wasn’t familiar with. After creating the SQL Server instance and the corresponding server, clicking on the new server name (di5fa5p2lg in this case) gave me the properties of that server, including the Manage URL:

image

SQL Azure database properties


If you click on the Manage URL, you will have a web interface for interacting with your SQL Azure server, but more importantly for this exercise, the FQDN is what I needed to plug into SSMS so that I can connect to that server. I’ll need that in a minute, because in the meantime, I’d discovered what looked like the killer feature for my needs in the 2014 edition of SSMS:

image

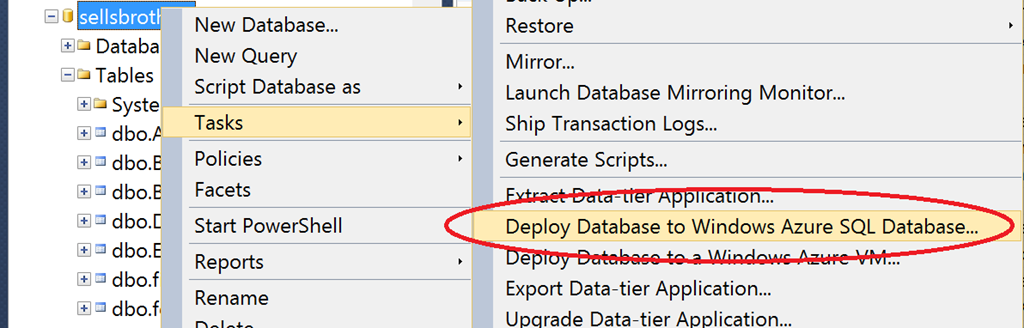
Deploy Database to Windows Azure Database in SSMS 2014


By right-clicking on the database on my ISP in SSMS and choosing Tasks, I had the Deploy Database To Windows Azure SQL Database option. I was so happy to choose this option and see the Deployment Settings screen of the Deploy Database dialog:

Untitled-2

SSMS Deploy Database dialog


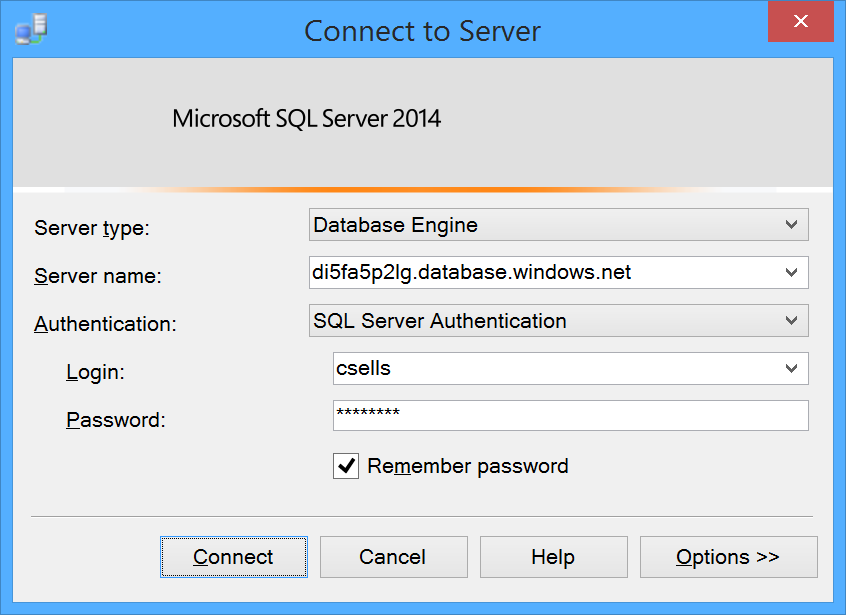
Notice the Server connection is filled in with the name of my new SQL Server instance on Azure. It started blank and I filled it in by pushing the Connect button:

Untitled-7

SSMS Connect to Server dialog


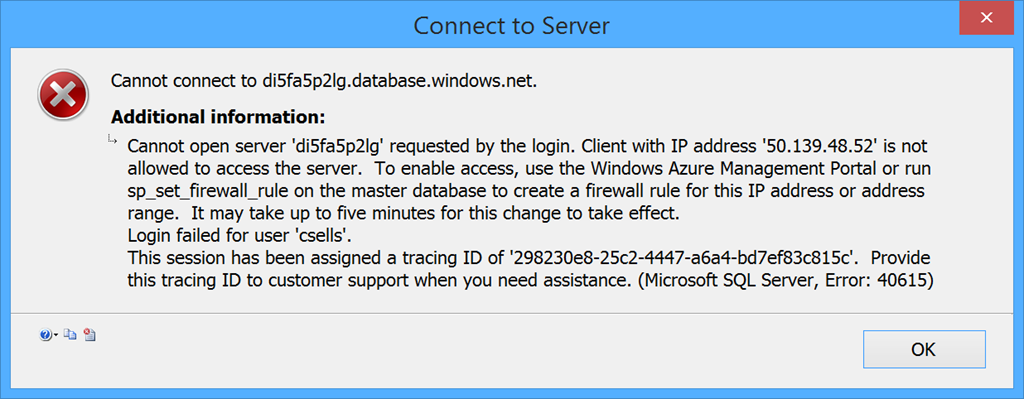
The Server name field of the Connect to Server dialog is where the FQDN we pulled from the Manage URL field of Azure database server properties screen earlier and the credentials are the same as I set when I created the database. However, filling in this dialog for the first time gave me some trouble:

Untitled-8

SQL Azure: Cannot open server foo’ requested by the login


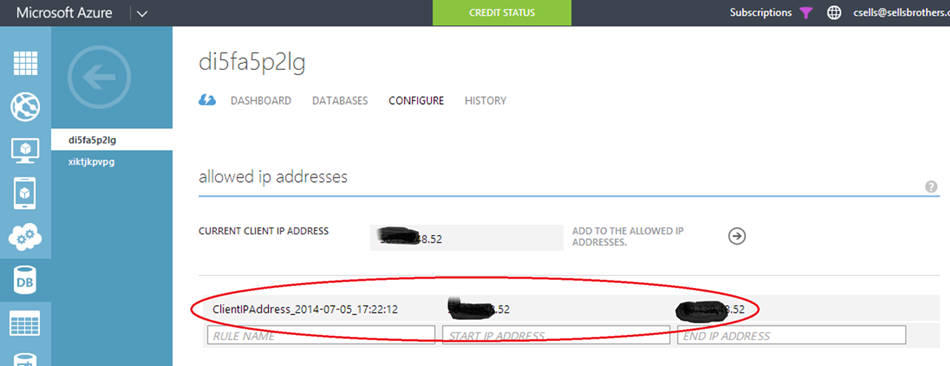
SQL Azure is doing the right thing here to keep your databases secure by disabling access to any machine that’s not itself managed by Azure. To enable access from your client, look for the Set up Windows Azure firewall rules for this IP address” option on the SQL database properties page in your Azure portal. You’ll end up with a server firewall rule that looks like the following (and that you may want to remove when you’re done with it):

image

SQL Azure server firewall rules


Once the firewall has been configured, filling in the connection properties and starting the database deployment from my ISP to Azure was when my hopes and dreams were crushed:

image

SSMS Deploy Database: Operation Failed


Clicking on the Error links all reported the same thing:

Untitled-4

Error validating element dt_checkoutobject: Deprecated feature String literals as column aliases’ is not supported by SQL Azure


At this point, all I could think was what the heck is dt_checkoutobject” (it’s something that Microsoft added to my database), what does it mean for to use string literals as column aliases (it’s a deprecated feature that SQL Azure doesn’t support) and why would Microsoft deprecate a feature that they used themselves on a stored proc that they snuck into my database?! Unfortunately, we’ll never know the answer to that last question. However, my righteous indignation went away as I dug into my schema and found several more features that SQL Azure doesn’t support that I put into my own schema (primarily it was the lack of clustered indexes for primary keys, which SQL Azure requires to keep replicas of your database in the cloud). Even worse, I found one table that listed errata for my books that didn’t have a primary key at all and because no one was keeping track of data integrity, all of the data was in that table twice (I can’t blame THAT on Microsoft : ).

And just in case you think you can get around these requirements and sneak your database into SQL Azure w/o the updates, manually importing your data using a bacpac file is even harder, since you now have to make the changes to your database before you can create the bacpac file and you have to upload the file to Azure’s blob storage, which requires a whole other tool that Microsoft doesn’t even provide.

Making your Database SQL Azure-compatible using Visual Studio

To make my SQL database compatible with SQL Azure required changing the schema for my database. Since I didn’t want to change the schema for a running database on my ISP, I ended up copying the database from my ISP onto my local machine and making my schema changes there. Getting to point of SQL Azure-compatibility, however, required me to have the details of which SQL constructs SQL Azure supported and didn’t support. Microsoft provides overview guidance on the limitations of SQL Azure, but it’s not like having an automated tool that can check every line of your SQL. Luckily, Microsoft provides such a tool built into Visual Studio.

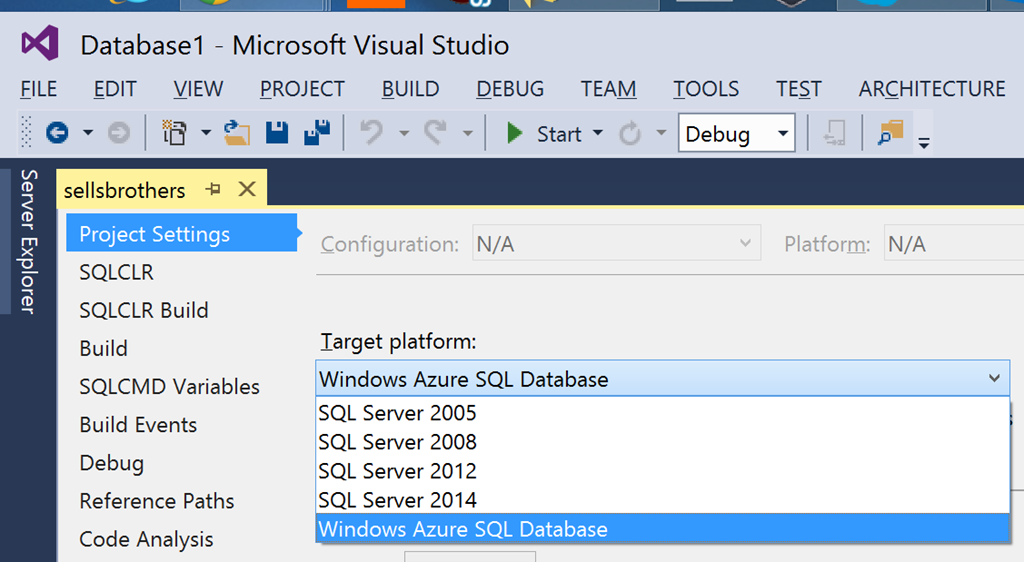
To bring Microsoft’ SQL compiler to bear to check for SQL Azure compatibility requires using VS to create a SQL Server Database Project and then pointing it at the database you’d like to import from (which is the one copied to my local machine from my ISP in my case). After you’ve imported your database’s schema, doing a build will check your SQL for you. To get VS to check your SQL for Azure-compatibility, simply bring up the project settings and choose Windows Azure SQL Database as the Target platform:

image

Visual Studio 2014: Setting Database Project Target Platform


With this setting in place, compiling your project will tell you what’s wrong with your SQL from an Azure point-of-view. Once you’ve fixed your schema (which may require fixing your data, too), then you can generate a change script that updates your database in-place to make it Azure-compatible. For more details, check out Bill Gibson’s excellent article Migrating a Database to SQL Azure using SSDT.

The Connection String

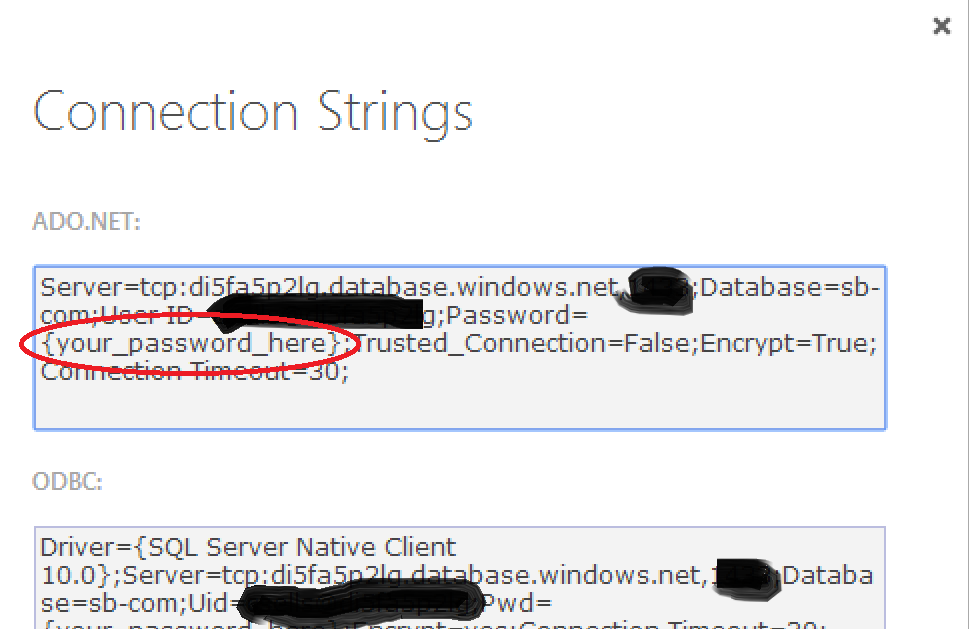
Once the database has been deployed and tested (SSMS or the Manage URL are both good ways to test that your data is hosted the way you think it should be), then it’s merely a matter of changing the connection string to point to the SQL Azure instance. You can compose the connection string yourself or you can choose the View connection strings for ADO.NET, ODBC, PHP and JDBC option from your database properties page on Azure:

image

SQL Azure: Connection Strings


You’ll notice that while I blocked out some of the details of the connection string in my paranoia, that Azure itself is too paranoid to show the password; don’t forget to insert it yourself and to put it into a .config file that doesn’t make it into the SCCS.

Where are we?

In porting sellsbrothers.com from an ISP to Azure, I started with the database. The tools are there (nice tools, in fact), but you’ll need to make sure that your database schema is SQL Azure-compatible, which can take some doing. In the next installment, I’ll talk about how I moved the implementation of the site itself, which was not trivial, as it is implemented in ASP.NET MVC 2, which has been long abandoned by Microsoft.

If you’d like to check out the final implementation in advance of my next post, you help yourself to the sellsbrothers.com project on github. Enjoy.

December 23, 2013 spout

Bringing The Popular Tech Meetups to Portland

Bringing The Popular Tech Meetups to Portland

pdx-tech-meetup-logoI’ve been watching the Portland startup scene for years. However, in the last 12 months, it’s really started to take off, so when I had an opportunity to mentor at the recent Portland Startup Weekend, I was all over it. I got to do and see all kinds of wonderful things at PDXSW, but one of the best was meeting Thubten Comerford and Tyler Phillipi. Between the three of us, we’re bringing the very popular Tech Meetup conference format to Portland.

The idea of a Tech Meetup is meant to be focused on pure tech. In fact, at the largest of the Tech Meetups in New York (33,000 members strong!), they have a rule where it’s actually rude to ask about the business model. The Tech Meetups are tech for tech’s sake. If you’re in a company big or small or if you’re just playing, cool tech always has a place at the Portland Tech Meetup.

The format is simple and if you’re familiar with the way they do things in Boulder or Seattle, you’re already familiar with it. Starting on January 20th, 2014, every 3rd Monday at 6pm, we’ll open the doors for some networking time, providing free food and drink to grease the skids. At 7pm, we’ll start the tech presentation portion of the evening, which should be at least five tiny talks from tech presenters of all kinds. After the talks, we’ll wrap up around 8pm and then head to the local water hold for the debrief.

If this sounds interesting to you, sign up right now!

If you’d like to present, drop me a line!

If you’d like to sponsor, let Thubten know.

We’re very excited about bringing this successful event to Portland, so don’t be shy about jumping in; the water is fine…

December 27, 2011 spout tools

GUI REPL for Roslyn

GUI REPL for Roslyn

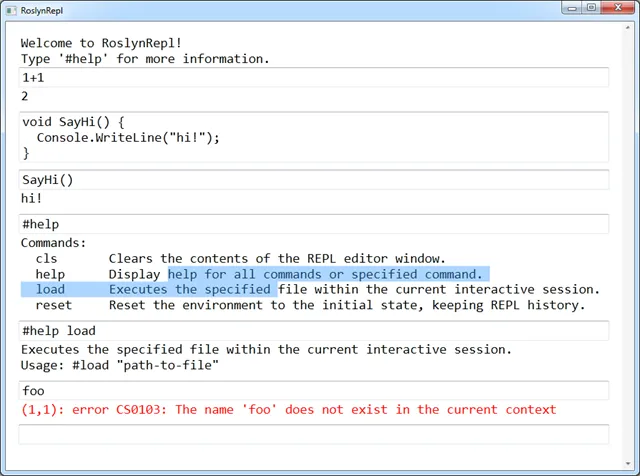
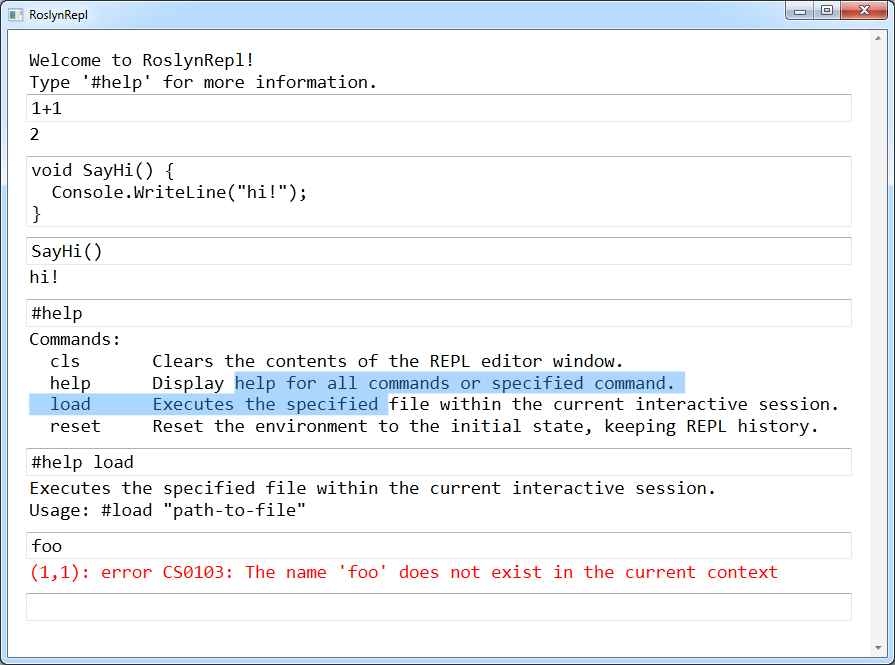
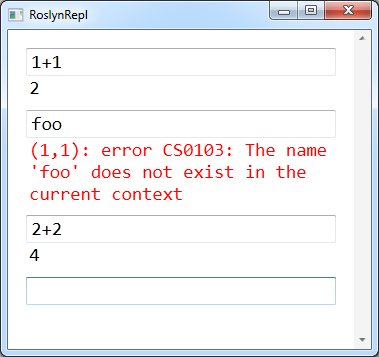
If you recall from REPL for the Rosyln CTP 10/2011, I’ve been playing around building a little C# REPL app using Roslyn. That version was built as a Console application, but I’ve refactored and rebuilt it as a WPF application:

image

You can download the source code for both the Console and the WPF versions here:

RoslynRepl Sample Download

The benefit of a real GUI app is that output selection makes a lot more sense and that you could imagine real data visualization into data controls instead of just into strings. However, implementing a REPL shell in a GUI environment requires doing things considerably differently than in a Console app. Besides the stupid things I did, like doing a lot of Console.Write, and things that don’t make sense, like #exit or #prompt, there are a few interesting things that I did with this code, including handling partial submissions, rethinking history and rewiring Console.Write (just cuz it’s stupid when I do it doesn’t mean that it shouldn’t work).

Partial Submissions

In this REPL, I decided that Enter means execute” or newline” depending on whether the submission is complete enough, according to Roslyn, to execute or not. If it is, I execute it, produce the output and move focus to either the next or a new submission TextBox. If the submission isn’t yet complete, e.g. void SayHi() {”, then I just put in a newline. Further, I do some work to work properly with selections, i.e. if you press Enter when there’s a selection, the selection will be replaced with the Enter key.

So far I like this model a lot, since I don’t have to something like separate execute” and newline” into Enter and Alt+Enter or some such.

Rethinking History

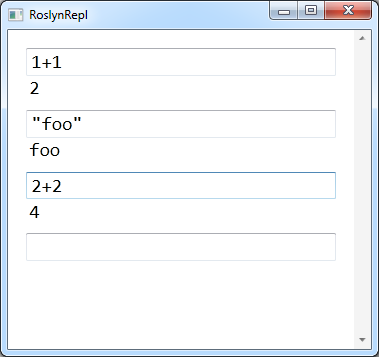
In a GUI shell with partial submissions and multi-line editing, the arrows are important editing keys, so can’t be used for access to previous lines in history. Further, a GUI apps makes it very easy to simply scroll to the command that you want via the mouse or Shift+Tab, so there’s not a lot of use for Alt+Arrow keys. Pressing Enter again replaces the old output (or error) with new output (or error):

imageimage

Currently when you re-execute a command from history, the command stays where it is in the history sequence, but it could as easily move to the end. I haven’t yet decided which I like better.

Redirecting Console.Write

Since this is a REPL environment works and acts like a shell, I expect that Console.Write (and it’s cousins like Console.WriteLine) to work. However, to make that work, I need to redirect standard output:

Console.SetOut(new ReplHostTextWriter(host));

The ReplTextWriterClass simply forwards the text onto the host:

class ReplHostTextWriter : TextWriter {
  readonly IReplHost host;

public ReplHostTextWriter(IReplHost host) { this.host = host; } public override void Write(char value) { host.Write(value.ToString()); } public override Encoding Encoding { get { return Encoding.Default; } } }

The hosts implementation of IReplHost.Write simply forwards it onto the currently executing submission (the ReplSubmissionControl represents both a submission’s input and output bundled together). You’ll notice that the TextWriter takes each character one at a time. It would be nice to do some buffering for efficiency, but you’d also like the output to appear as its produced, so I opted out of buffering.

However, one thing I don’t like is the extra newline at the end of most string output. I want the main window to decide how things are output, setting margins and the newline looks like a wacky margin, so the trailing CR/LF had to go. That’s an interesting algorithm to implement, however, since the characters come in one at a time and not line-by-line. I want separating newlines to appear, just not trailing newlines. I implement this policy with the TrimmedStringBuilder class:

// Output a stream of strings with \r\n pairs potentially spread across strings,
// trimming the trailing \r and \r\n to avoid the output containing the extra spacing.
class TrimmedStringBuilder {
  readonly StringBuilder sb;

  public TrimmedStringBuilder(string s = "") {
    sb = new StringBuilder(s);
  }

  public void Clear() {
    sb.Clear();
  }

  public void Append(string s) {
    sb.Append(s);
  }

  public override string ToString() {
    int len = sb.Length;

    if (len >= 1 && sb[len - 1] == '\r') {
      len -= 1;
    }
    else if (len >= 2 && sb[len - 2] == '\r' && sb[len - 1] == '\n') {
      len -= 2;
    }

    return sb.ToString(0, len);
  }
}

Usage inside the ReplSubmissionControl.Write method is like so:

public partial class ReplSubmissionControl : UserControl {
...
  TrimmedStringBuilder trimmedOutput = new TrimmedStringBuilder();

  public void Write(string s) {
    if (s == null) { trimmedOutput.Clear(); }
    else { trimmedOutput.Append(s); }

    consoleContainer.Content = GetTextControl(trimmedOutput.ToString());
  }
}

Now, as the input comes in one character at a time, the trailing newlines are removed but separating newlines are kept. Also, you may be interested to know that the GetTextControl function builds a new read-only TextBox control on the fly to host the string content. This is so that the text can be selected, which isn’t possible when you set the content directly.

Right now, there’s no support for Console.Read, since I don’t really know how I want that to happen yet. Pop-up a dialog box? Something else?

Completions, Syntax Highlighting and Auto-indent

I was a few hundred lines into implementing completions using Roslyn with the help of the Roslyn team when I realized two things:

  1. Implementing completions to mimic the VS editor is hard.
  2. Completions aren’t enough — I really want an entire C# editor with completions, syntax highlighting and auto-indentation.

Maybe a future release of Roslyn will fix one or both of these issues, but for now, both are out of scope for my little REPL project.

December 27, 2011 spout

Moving to the Cloud Part 2: Mostly Sunny

Moving to the Cloud Part 2: Mostly Sunny

In part 1 of this now multi-part series (who knew?), I discussed my initial attempts at moving my digital life into the cloud, including files, music, photos, notes, task lists, mail, contacts, calendar and PC games.There were some issues, however, and some things that I forgot, so we have part 2.

Before we get to that, however, it’s interesting (for me, at least) to think about why it’s important to be able to move things into the cloud. Lots of vendors are busy making this possible, but why? There are backup reasons, of course, so that a fire or other natural disaster doesn’t wipe out all of the family pictures. There are also the ease of sharing, since email makes a very poor file sharing system. Also, multi-device access is certainly useful, since the world has moved into a heterogeneous OS world again as smartphones and tablets take their place at the table with PCs.

For me, however, moving my data into the cloud is about freedom.

The cloud enables me to get myself bootstrapped with data associated with my personal or business life, using whatever device or OS I feel like using that day. It provides me freedom of location or vendor.

The cloud is still forming, however, so hasn’t really been able to make this a seamless experience, which is why I’m onto part 2 of this series.

Mail, Contacts and Calendar

Hotmail is a fine system for online access to mail, contacts and calendar that integrates well with Windows Phone 7. However, the integration with desktop Outlook and my custom domain isn’t good enough yet to rely on. The primary problem was the Hotmail Outlook Connector, which isn’t ready yet for prime time. It worked great with calendar and contacts, but fell down badly when it came to large email folders that I moved from my PST file. It never showed the sync’ing progress as complete, which made me uncomfortable that it never actually completed sync’ing and therefore my data wasn’t safe. Also, when I sent an email from Hotmail, either via the web or via Outlook, it showed the reply address as hotmail_44fe54cff788bdde@live.com. I assume the latter would’ve been fixed with Windows Live custom domains, but the former was the real deal-killer for me.

Also, I heard that Google Apps is the way to go, but that also requires some special software to enable sync’ing with desktop Outlook — I wanted something that was native to both Outlook 2010 and Windows Phone 7. Further, it cost money, so if I was going to pay, I wanted something that Microsoft was going to integrate well with.

So, I bit the bullet and hooked myself with the latest in hosted Exchange — Microsoft Office 365. That’s what I’m using now and just like the on-premise Exchange that worked great for me as a Microsoft employee, I’ve been very happy with it. However, because of the way I was using it, it was a pain to configure properly for use in hosting my csells@sellsbrothers.com email.

The easy way to configure Office 365 is to let it be the DNS name manager, which lets it manage everything for you, including your web site (via SharePoint), your mail, your Lync settings and any future service they care to tack on. However, that doesn’t work for me, since I didn’t want to move my 16-year-old web site into SharePoint (duh). Instead, I wanted to leave my DNS name manager at securewebs.com, which has been a fabulous web hosting ISP for me.

A slightly harder way to configure Office 365 for use with your domain is to only be used for selective services, e.g. set the MX record for mail, but don’t mess with the CNAME record for your web site. This would’ve been nice, too, except I don’t want to move all of the email accounts on sellsbrothers.com — only csells. Why? Well, that’s a family matter.

Over the years at family gatherings, to seem geek cool, I’ve offered free email boxes to my relatives. Oh? You’re moving to another ISP again? Why don’t you move your email to sellsbrothers.com and then you can keep the same email address forever! And the best part is that it’s free!”

Now, of course, I’d recommend folks get an email address on hotmail or gmail, but this all started before the email storage wars back when you needed an actual invitation to set up a gmail.com account. Now I’ve got half a dozen family members with permanent” and free” email boxes and I don’t want to a) move them, b) charge them or c) pay for them myself on Office 365.

As cheap as you might think I am, it’s really migration that I worry most about — having successfully gotten them set up on their phones and PCs with their current email host, I don’t want to do that again for Outlook or migrate their email. Maybe it’s easy, maybe it’s hard. We’ll never know cuz I’m not doing it!

So now, I have to make csells@sellsbrothers.com sync with Office 365 and leave everyone else alone. This is the hardest way to use Office 365 and involved the following:

  • Set up a custom domain in Office 365: sellsbrothers.onmicrosoft.com
  • Add myself as a user: csells@sellsbrothers.onmicrosoft.com
  • Verify that I own sellsbrothers.com by asking securewebs.com support to add a DNS TXT record as specified by Office 365 (this took two weeks and a dozen emails)
  • Make csells@sellsbrothers.com the primary email on that account
  • Make csells@sellsbrothers.com the From address by removing csells@sellsbrothers.onmicrosoft.com and adding it back again
  • Configure my ISP email (SmarterMail) to forward csells@sellsbrothers.com email to csells@sellsbrothers.onmicrosoft.com (I’m not also deleting the email on my ISP account yet when it forwards, but eventually I plan to)
  • Login to my Outlook Web Access account on http://mail.office365.com
  • Find my Outlook host name via Help | About | Host name (ch1prd0502.outlook.com) for use as my Outlook server on my Windows Phone 7 (along with my From email address: csells@sellsbrothers.com)
  • Stumbling onto the right technical forum post to figure out how to configure desktop Outlook 2010 using advanced settings:
    • Server: ch1prd0502.mailbox.outlook.com (my host name with mailbox” thrown in)
    • User name: csells@sellsbrothers.com (my From address)
    • Exchange Proxy Server: ch1prd0502.outlook.com (my Host name again)
    • Check both checkboxes to use HTTP first before TCP/IP
    • Authentication: Basic Authentication

Obviously, this is a crappy configuration experience, but no amount of manual updates to Outlook provided by the Office 365 site seemed to help. It was nice that the WP7 Outlook was much easier, although I’d really loved to have just told desktop Outlook that I was an Office 365 user and had it figure out all the touchy config settings.

Everything seems solid except one minor annoyance: when I do a Reply All, csells@sellsbrothers.com stays in the list because my mail programs don’t know that my csells@sellsbrothers.com and csells@sellsbrothers.onmicrosoft.com email addresses are logically the same. I assume if I was hosting my MX records at Office 365, this problem, along with the crappy config experience, would go away.

The good news is that I’ve got access to my full range of Mail, Contacts and Calendar from the web, my phone and my desktop, including multi-GB email folders I’ve copied over from my PST file, all for $6/month. Had I to do it over again, I’d have long ago moved my family to hotmail and avoided the config nightmare. I may yet do just that.

Encrypted Files

With my mail et al sorted, my next fix from last time was the lack of confidence in my most sensitive files with Dropbox. Dropbox can be hacked or subpoenaed like anyone else, so I want a client-side encryption solution. Dropbox may someday provide this themselves, but currently they gain a great deal of storage savings by detecting duplicate blocks amongst their users, saving significantly on uploads and storage, which client-side encryption disrupts. In the meantime, I really want an app that encrypts on the client and drops my data into Dropbox, which BoxCryptor does nicely.

In addition to supporting Windows, BoxCryptor also supports MacOS, iOS and Android, although not WP7 yet. Further, it’s free for 2GB and only a $40 one-time fee for unlimited data, so it’s cheap, too.

I also looked at SecretSync, which has a similar cross-platform story and pricing model (although it’s $40/year instead of $40/once), but it requires Java and I don’t put that on my box. For an open source solution, you may be interested in TrueCrypt.

imageFinancial Data

I’m a mint.com user. I like the idea of an all-up look at my finances across 29 online financial accounts. However, as a backup of that data, I wrote a mint.com scraping tool that downloads the CSV transactions export file and digs current snapshot data out of the homepage HTML. The format on the web site is constantly changing of course, so it’s a support problem, but having that data even a little messed up over time is way better than not having it at all, so I’m happy. The data itself goes into CSV files that I can query with LINQPad and that are stored in my Dropbox folder, which keeps them sync’d.

Books and Bookmarks

I can’t believe I missed this last time, but one of the big things I keep in the in the cloud is my set of Amazon Kindle books. I think that the proprietary format and DRM of Kindle materials will eventually open up because of competition, but until then, Amazon has been a great steward of my online books and bookmarks, providing me clients for all new platforms as well as their own e-ink-based hardware. I have an extensive book collection (this is just part of it), but am adding to the physical part of it no more.

Further, in the case that I have the what the hell was that book I used to have?” moment after I finally truck all of my books off to Powell’s, the Brothers Sells have scanned all of the ISBN numbers from my 500+ books into LibraryThing. I won’t have the books anymore, but at least I’ll be able to browse, refresh my memory and add the books to Kindle on demand. The reason I picked LibraryThing is because it was easy to get all of the book metadata from just an ISBN (so it’s easy to spot data entry errors early), it’s easy to export from in a CSV file and, should I decide, easy to user their API.

App Specifics

In addition to the big categories, several apps keep data important to me:

  • Twitter keeps Twitter users I’m following and searches
  • Facebook keeps Facebook contacts, which is nice because they can maintain their own contact data for me and I don’t have to be constantly out of data with my copy
  • Windows Live Messenger keeps my IM contacts for me, although Facebook has largely replaced that for IM chatting
  • As of the latest update, Xbox game state in the cloud for me, although I’m not a big enough gamer that I really need it anywhere else except my home console. I assume in the future, MS will also keep the Xbox games I’ve purchased in the cloud as well
  • Hulu keeps a list of several TV shows I like and notifies me when new episodes are available
  • Netflix keeps a partial list of movies I’d like to see, but unfortunately not all of them
  • I keep my blog posts in an instance of SQL Server maintained on securewebs.com, which I assume they backup regularly. Someday I’ll write the script to pull that data out into my Dropbox just in case. The source code for the site itself is already stored in Dropbox, so I’m set there
  • Favorites: I don’t have a good app here, but I’d love it if some app could keep my IE favorites sync’d between my phone and my other computers. Suggestions?

Things Left On The Ground

As you may have surmised, I don’t put a lot of sentimental value in physical things. They’re not nearly as important to me as people, experiences or data. However, there are some things that I’d want to rescue in case of disaster given the chance:

  • A few wrist watches that reminds me of a special person or event
  • An inscribed copy of The Complete Sherlock Holmes that my grandfather, my father and I have all read
  • Inscribed copies of The Hobbit and The Lord of the Rings trilogy that my mother read to me as a child
  • A leather bound copy of Batman: The Dark Knight Returns because Frank Miller kicks ass
  • Two pieces of marble and maple furniture that my grandfather built to withstand the onslaught from my mother barreling through each room at top speed as a child (I’d have liked to see the first collision of the immovable object and the irresistible force that day!)

As hard as I try, I can’t think of anything else. Should I have to jam, my plan is to place these few items into safe keeping and sell, donate and/or toss the rest.

Where Are We?

As I write this, I’m sitting in a Starbucks in Sandy, OR, 20 minutes from a cabin I’m renting for a few days. When I’m done here, I’ll explore the town, see a movie and make myself some dinner. I won’t worry about my phone, my laptop or my home being lost or destroyed, since 98% of the possessions I deem most valuable are being managed by cloud vendors I trust.

The cloud doesn’t just represent a place to backup or store data — it represents a way of life.

My data stores a lifetime of experiences, people and knowledge. By keeping it safe and available no matter where I go, I gain the freedom to wander, to experience new physical places and new hardware and software solutions, all without being unduly burdened.

Creative work requires a comfortable place to labor filled with the tools and the materials the worker needs to be creative. Today my tools are an Apple MacBook, Windows 7, Office 2010, Visual Studio 2010 and a Samsung Focus. Yesterday those tools were different and I’m sure they’ll be different again tomorrow. However, while other people build up their place with comfortable things around them — a bookshelf for reference, a comfy chair, knick-knack reminders of events or trips — my place is a lifetime of data and anywhere that provides access to electrons and bits.

Having my data safe, secure and available makes me feel comfortable, creative and free.

December 16, 2011 spout

Sells Manor: Running 64-bit Win8 on My MacBook Air

Sells Manor: Running 64-bit Win8 on My MacBook Air

With the exception of //build/, I haven’t really been a public part of the Microsoft developer community for about a year. So, to make up for some lost time, I’m giving a talk about some of the //build/ bits at the Portland Area .NET User Group first thing in the new year. This means that I need a running installation of the Windows 8 Developer Preview on my new laptop, cuz THE MAN took my old laptop back when I handed in my badge (although, to be fair, they paid for it in the first place : ).

My constraints were as follows:

  • I really like boot-to-VHD. I find that any other kind of virtualization technology slows an OS down enough that it negatively affects any talk I would give.
  • I have an existing VHD I wanted to reuse with Win8 and VS11 installed and running just fine already.
  • I am running it on a MacBook Air. It’s the big one with quad-core i7, 4GB of RAM and 256GB of SSD, so it’s got the muscle but it needs to drivers to make everything work properly.
  • I’m running Windows 7 on my MacBook. The wonderful Boot Camp Assistant in MacOS makes it a snap to get Win7 up and running on a MacBook, but making it run with Win7 and Win8 is a special challenge.

So, with all of that in mind, of course I started with Hanselman’s Guide to Installing and Booting Windows 8 Developer Preview off a VHD post. If you’re willing to build a new VHD, that’s the way to go. However, I was able to use the techniques I learned from that post, especially the comment section and a couple tips from my friend Brian Randall to make my existing Win8 VHD work. Some of this may work for you even if you don’t have a MacBook Air.

Getting Windows 7 Running on my MacBook Air

I started with a virginal MacBook and used the built in Boot Camp to create a Win7 partition, point to a Win7 Ultimate ISO I have on a network share for just these kinds of emergencies and get it installed and running. It wasn’t seamless, but Bing was helpful here to straighten out the curves.

Replacing the Boot Manager

The way I like to create VHDs is via Windows Server 2008 and Hyper-V. Once I have the VHD, I drop it onto the c:\vhd folder on my computer, do a little bcdedit magic and boom: when I reboot, I’ve got a new entry from which to choose my OS of the moment.

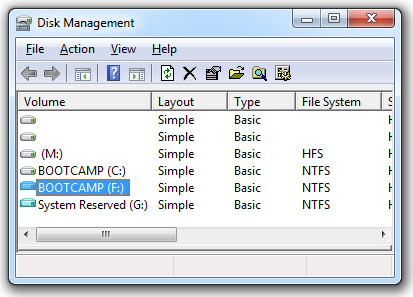
However, Win8 doesn’t boot from the Win7 boot manager, so the first thing I needed to do (as implied by the comments in Scott’s post) was use bcdboot to replace the Win7 book manager with the Win8 boot manager. To do that, boot into Win7 and fire up the Disk Management tool (Start | Run: diskmgmt.msc). Select your BOOTCAMP drive and choose Action | Attach VHD. Choose the path to your VHD and you’ll get another virtual disk:

image

In my case, C was my Win7 Boot Camp HD and F was my Win8 VHD. Now, start an elevated command prompt and use bcdboot to replace the Win7 boot manager with the Win8 book manager.

DISCLAIMER: I’m stealing the works on my machine” graphic from Hanselman’s site because this action replaces a shipping, maintained, supported boot manager with one that is still in developer preview” mode. Make sure you have your computer backed up before you do this. I am a trained professional. Do not attempt this at home. All stunts performed on a closed course. Some assembly required. Void where prohibited. I’m just sayin’.

image

Now that you’ve got the right boot manager in place, getting Win8 to boot requires bcdedit.

Getting Windows 8 to Boot

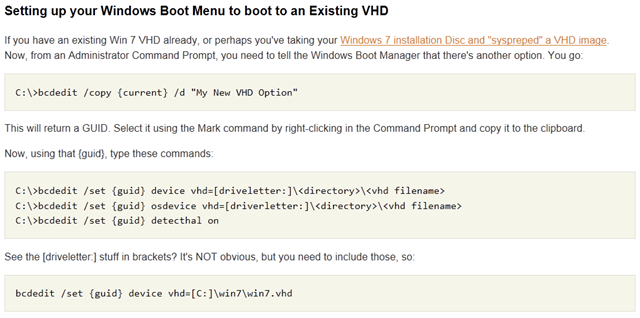
Scott’s post on booting to VHD involves bcdedit, which describes adding a new boot option in the Setting up your Windows Boot Menu to boot to an Existing VHD section:

image

Use bcdedit to point to the Win8 VHD.

Logging into Windows 8 on a MacBook

Now when you boot your MacBook, you’ll choose to boot to your Windows partition as you always have (which should just happen automatically), but then the Win8 book manager will kick in and you choose your Windows 7 install or your new Windows 8 install. Booting into Windows 8 shows you the login screen as normal, but now you have another problem.

The MacBook keyboard comes without a Windows Delete button. Oh sure, it’s labeled delete” in trendy lowercase letters, but it’s really the equivalent of the Windows Backspace button. And that’s a problem, because you need to press Ctrl+Alt+Del to log into Win8.

Of course, Apple thought of that, so they created the Boot Camp drivers for Windows that maps fn+delete to Delete, but you can only install them after you’ve logged in.

So how do you log into a MacBook without a Delete button? Easy. You attach an external USB keyboard, press that three-fingered salute and login as normal.

Once you’re in that first time, you can install the Boot Camp drivers and never have to use the external keyboard again.

Installing the Boot Camp Drivers on Win8

When I created the Boot Camp USB to install Win7, it came with a set of drivers in the WindowsSupport folder with a wonderful setup.exe that makes Windows run great on the MacBook. Unfortunately, when you try to run it, you get a message that says you can’t:

Untitled

If you search the internet, you can find folks that have gotten past this by tricking setup.exe into thinking it’s running on Win7, but you’ll also find that those tricks don’t seem to work for 64-bit installs on MacBook Air, i.e. the one I was doing. However, this is where Brian had another suggestion: you can edit the Boot Camp MSI itself.

DISCLAIMER: This is something that I made work surprising well on my own personal MacBook Air, but I provide no guarantee that it won’t cause your computer to burst into flames on an international flight causing your body to be lost at sea. These techniques are not supported by Microsoft, Apple or the American Dental Association. You’ve been warned.

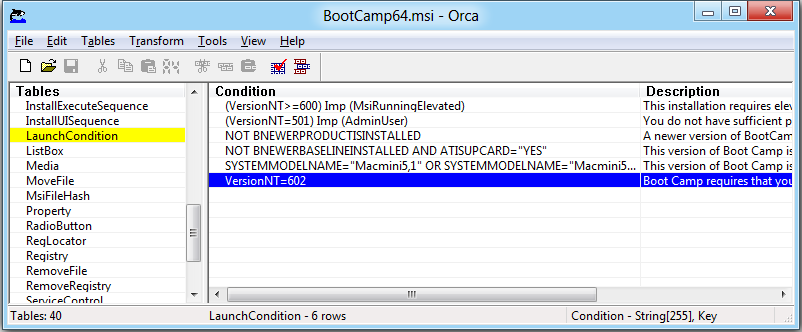
You may wonder, To what MSI is Mr. Sells referring?” And I answer: WindowsSupport\Drivers\Apple\BootCamp64.msi. This is the 64-bit MSI with the check in it for Windows 7. To make it work for Windows 8, you need to edit the MSI and change the version number. And to do that, the easiest tool I know of is the unsupported, discontinued Orca MSI editor from Microsoft, now hosted on technipages.com. Running Orca allows you to edit BootCamp64.msi and change the Windows version part of the LaunchCondition from 601 (Windows 7) to 602 (Windows 8):

orca

Once you’ve changed this version, WindowsSupport\setup.exe seems to run just fine, installing the keyboard entries that allow you to login and the control panel that allows you to customize everything.

Where Are We?

Starting from a Boot Camp installation of Windows 7 on my MacBook Air, I showed you how I was able to get Windows 8 booting from a VHD. It wasn’t pretty and it required tips from all over the internet. I gather them here today so that future anthropologists will know how hard we worked to enable the coming of our robotic overlords. If you’re able to use these instructions to expedite their arrival, I’m sure they’ll take that into consideration when they’re sorting us into work details.

P.S. This post is dedicated to Jerry Pournelle. I used to pour over his Byte magazine column every month like he was the computer Sherlock Holmes.

December 14, 2011 spout tools data

Moving My Data To The Cloud: Stormy Weather

Moving My Data To The Cloud: Stormy Weather

For years, I’ve maintained a single main” computer. It was the computer that was the central authority of all of the personal data I’d accumulated over the years and from which it made me uncomfortable to be separated. Because I needed a single computer for everything, it had to work on my couch, on a plane, on a desk and everywhere else I ever needed to go. Also, it couldn’t have a giant monitor or multiple monitors, because it had to go everywhere. All of this was because I needed all of my data with me all of the time.

My process for moving to a new computer used to include a lot of manual copying of files from the old D hard drive (D is for Data) to my new hard drive, which was also carefully partitioned into C for Windows, Office, Visual Studio, etc. and D for a lifetime of books and articles, coding projects and utilities I’ve collected over the years, e.g. LinqPad, Reflector, WinMerge, etc. This is 30GB of stuff I wanted access to at all times. I was also backing up via Windows Home Server, keeping photos and music on the WHS box (another 30GB), then backing that up to the cloud via KeepVault. And finally, as I upgraded HDs to go bigger or go to solid state, I kept each old HD around as another redundant backup.

All of that gave me some confidence that I was actually keeping my data safe right up until my Windows Home Server crashed the system HD and I found out that the redundancy of WHS doesn’t quite work the way you’d like (this was before I installed KeepVault). This was a first generation HP Home Server box and when it went down, I took it apart so I could attach a monitor, keyboard and mouse to diagnose it, pulled the HDs out so I could read what files I could and ultimately had to drop it off in Redmond with the WHS team so I could get it up and running again.

There are some files I never got back.

KeepVault gave me back some of the confidence I’d had before WHS crashed, but they didn’t provide me a way to see what files they were backing up, so I didn’t have the transparency I wanted to be confident. Further, they don’t have clients on every kind of platform like Dropbox does.

Of course, simply sync’ing files isn’t enough — sync’ing my 10GB Outlook PST file every time I got a new email was not a good way to share 20 years of contacts, email and calendar items.

The trick is to sync each kind of data in the right way, be confident that it’s safe and have access to it across the various platforms I use: Windows, Windows Phone 7, iOS and possibly Android (you know, if I feel like walking on the wild side!). And since I’m currently under employed (my new gig doesn’t start till the new year), I figured I’d do it once and do it right. I almost got there.

Files

Let’s start easy: files. Dropbox has made this a no-brainer. You install the software on any platform you care to use, drop everything you want into the folder and it just works, keeping files in sync on the cloud and across platforms, giving you adequate (although not great) status as it does so. Most platforms are supported natively, but even on platforms that aren’t, there are often alternative clients, e.g. I’m using Boxfiles for Windows Phone 7. When I gave up my Microsoft laptop, instead of doing the dance of the copy fairy to my new Mac Book Air, I installed Dropbox on both computers, dropped everything I want backed up and sync’d between computers into the Dropbox folder. 36 hours and 30GB later, all of it was copied into the cloud and onto my new laptop, at which point I reformatted my Microsoft laptop and handed it into my boss.

Further, as a replacement for WHS and KeepVault, I now keep all of the files that I was keeping just on my WHS server — photos and music primarily — into Dropbox.

image

This keeps me the confidence I need to know that my files are safe and backed up to the cloud, while making it very easy to keep it backed up locally by simply running Dropbox on more than one computer at my house. If at any time, I don’t want those files on any one computer, I tell Dropbox to stop sync’ing those folders, delete the local cache and I’m all done.

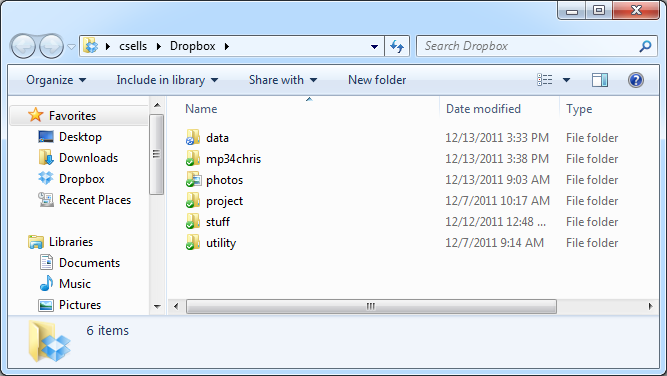
There are two tricks that I used to really make Dropbox sing for me. The first is to change my life: I no longer partition my HDs into C and D. The reason I’d always done that was so that I could repave my C with a fresh Windows, Office and VS install every six months w/o having to recopy all my data. Windows 7 makes this largely unnecessary anyway (bit rot is way down on Win7), but now it doesn’t matter — I can blow any computer away at will now, knowing that Dropbox has my back. In fact, Dropbox is my new D drive, but it’s better than that because it’s dynamic. The C drive is my one pool of space instead of having to guess ahead of time how to split the space between C and D.

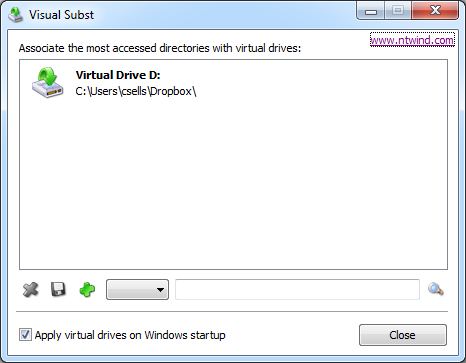
The other thing I did was embrace my previous life: I wanted to keep D:\ at my fingertips as my logical Data” drive. Luckily, Windows provides the subst” command to do just that. Further, ntwind software provides the fabulous VSubst utility to do the mapping and keep it between reboots:

image

Now, I’ve got all the convenience of a dedicated data” drive backed up to the cloud and sync’d between computers. Because I needed 60GB to start, I’m paying $200/year to Dropbox for their 100GB plan. This is more expensive than I’d like, but worth it to me for the data I’m storing.

There is a hitch in this story, however. Right now on Dropbox, data and metadata is available to Dropbox employees and therefore to anyone that hacks Dropbox (like the government). I don’t like that and for my very most sensitive data, I keep it off of Dropbox. When Dropbox employees themselves aren’t able to read Dropbox data or metadata, then I’ll move the sensitive data there, too.

Music

I’m not actually very happy with how I’m storing music. I can play all my music on any PC, but I can only play it one song at a time on my WP7 because there’s no Dropbox music client. I could use the Amazon cloud drive that provides unlimited music storage for $20/year, but there’s no WP7 client for that, either. Or I could spend $100/year on Amazon and get my 100GB of storage, but their client isn’t as widely available as Dropbox. Ironically, Dropbox is using Amazon as their backend, so hopefully increased pressure in this space will drop Dropbox’s prices over time.

Photos

I’m not using Facebook or Flicr for my photos simply because I’m lazy. It’s very easy to copy a bunch of files into Dropbox and have the sync’ing just happen. I don’t want to futz with the Facebook and Flickr web interfaces for 15GB worth of photos. Right now, this is the digital equivalent of a shoebox full of 8x10s, but at least I’ve got it all if the house burns down.

imageNotes and Tasklist

For general, freeform notes, I moved away from Evernote when they took the search hotkey away on the Windows client (no Ctrl+F? really?) and went to OneNote. The web client sucks, but it’s better than nothing and the Windows and WP7 clients rock. I have a few notes pinned to my WP7 home screen that I use for groceries, tasks, etc., and I have all of my favorite recipes in there, too, along with my relatives’ wi-fi passwords that they don’t remember themselves, a recording of my son snoring, etc. It’s a fabulous way to keep track of random data across platforms.

On the task list side, I only sorta use OneNote for that. I also send myself emails and write little TODO.txt files every time I get a little bee in my bonnet. I’ve never found that the Exchange tasks sync well enough between platforms to invest in them. Maybe someday.

imageMail, Contacts and Calendar

And speaking of Exchange, that’s a piece of software that Microsoft spoiled me on thoroughly. This is sync that works very well for contacts, emails and calendar items. IMAP does email folders, but server implementations are spotty. For years, I used Exchange for my personal contacts and calendar, only keeping my personal email separate in a giant PST file, pulling it down via POP3. This can sorta be made to work, but what I really wanted was hosted Exchange.

However, what I found cost between $5 and $11 a month per user. I’d probably have gone with Office 365 for sellsbrothers.com mail, even at $5/month except for two reasons. The first is that Microsoft requires you to move your entire DNS record to them, not just the MX record, which means there is all kinds of hassle getting sellsbrothers.com working again. They do this so that they can get all of the DNS records working easily for Lync, Sharepoint, etc., but I don’t want those things, so it’s just a PITA for me. If they change this, I’d probably move except for the other problem: I’m not the only user on sellsbrothers.com.

For years to be the big shot at family gatherings, I’ve been offering up permanent, free email addresses on my domain. That’s all well and good, but now to maintain my geek cred, I need to keep my mom, my step-mom, my brother, my sons, etc., in an email server that works and one that they don’t have to pay for. So, while I was willing to pay $5/month for hosted exchange for me, I wasn’t willing to pay it for my relatives, too!

One option I tried was asking securewebs.com (my rocking ISP!) to upgrade to SmarterMail 8.x, but that didn’t work. I even footed the one-time fee of $200 for the ActiveSync support for SmarterMail, but I couldn’t make that sync from Outlook on the desktop or the phone either.

Eventually I made an imperfect solution work: Hotmail. The nice thing about Hotmail is that it’s free for 25GB (yay webmail storage wars!) and it syncs contacts, mail and calendar items just like I want. Further, with some effort (vague error messages are not useful!), I was able to get Hotmail to pull in my personal email. And, after installing the Outlook Hotmail Connector (explicitly necessary because my Windows Live ID is not a @live.com or an @hotmail.com email address), I was able to sync almost everything, including the folders I copied from my giant PST file, via hotmail to both my desktop and phone Outlook. However, there are a few downsides:

  • There is an intrinsic delay between when someone sends me an email and when it syncs to any device because Hotmail is polling via POP3. This polling is annoying and sometimes sends me directly to the web mail frontend where I can interact with my personal email directly.
  • The Outlook Hotmail Connector sync’ing progress indication is terrible in that it seems to stack every time I press F9 (a bad habit from years of POP3 usage) and I can’t tell what it’s working or or when it will finish. Because of this, I’ve trimmed the set of email folders I sync to the ones I really use, using the PST file as an archive for days gone by.
  • Hotmail does the right thing with the Reply To”, but sometimes weird @hotmail addresses with random characters shows up in email threads, which breaks the fourth wall. That’s annoying.
  • My RSS Folders don’t sync to my phone, which is a shame because I really loved having my Hacker News folder pinned to my WP7 home page letting me know where there were new items. None of the RSS readers on WP7 seem to work as well as a simple pinned email folder.

The good news is that this all works for free and my relatives continue to have working email. The bad news is that it doesn’t work nearly as well as the Exchange server I’m used to. Hopefully I will be able to revisit this in the future and get it working correctly.

imagePC Games

I purchase all of my games via Steam now and install them as the mood strikes me. I love being able to reinstall Half-Life 2 or Portal on demand, then blow it away again when I need the hard drive space. Steam is the only viable app store for Windows right now, although I am looking forward to have the Microsoft app store in Windows 8.

imageBackups

I no longer maintain backups” in the sense that I can slap in a new HD, boot from a USB stick and have my computer restored in 30 minutes or less (that never worked between WHS and Dell laptops anyway). I’ve had HD problems, of course, but they’re so rare that I no longer care about that scenario. Instead, what I do is keep all of the software that I normally install on a file server (the new job of my WHS box). If the file server goes down, then most of the software I install, i.e. Windows 7, Office and Visual Studio, is available for download via an MSDN Subscription. The rest is easily available from the internet (including Telerik tools and controls!) and I just install it as I need it.

Where Are We?

In order to free myself from any specific PC, I needed to pick a new centralized authority for my data: the cloud. The experience I was after for my PCs was the same one I already have on my phone — if I lose it, I can easily buy a new one, install the apps on demand and connect to the data I already had in Exchange, Hotmail, Skydrive, etc. Now that I’ve moved the rest of my world to Dropbox, I can treat my PCs and tablets like phones, i.e. easily replaceable. It’s not a perfect experience yet, but it’s leaps and bounds ahead of where it was even a few years ago.

Hardware and software comes and goes; data is forever.

December 13, 2011 spout telerik

Goodbye Microsoft, Hello Telerik!

Goodbye Microsoft, Hello Telerik!

I have gotten to do a ton of really great things at Microsoft:

  • I got to write a column on WPF and turn that column into not one, but two books.
  • I got the excitement for every blog post in the first two years wondering if this was the one that was going to get me fired. (It was close a few times.)
  • I got to throw several Developer Conferences (DevCons).
  • I got to spin up a completely new community from scratch (“Oslo”).
  • I got to stay up all night erasing the word WinFS” from all of microsoft.com.
  • I got to be part of a Microsoft product team from incubation through startup to product and then to kaput.
  • I got to get ordained as a minister so that I could marry a PM from the WPF team to a PM on the WCF team as part of the talk I gave with Doug Purdy at the 2008 PDC.
  • I got to prepare for that talk with Doug until 4am, then walk back to the hotel, causing people to cross the street to stay away from us. And then I got to give that talk with Doug the next morning right after restoring my copy of Windows that had crashed 30 minutes before.
  • I got to drag Lars Wilhelmsen up on stage to read Norwegian from the Oslo Tour Guide book, only to find I was pointing him at German.
  • I got to throw an SDR.
  • I got to play poker with Microsoft power brokers far above my level (and take their money : ).
  • I got to sleep at Don Box’s house and become an adjunct part of his family.
  • I got to have two design reviews with Bill Gates (as hard as I tried, I could never see him actually enter the room).
  • I got to turn developer feedback into hundreds of bugs across dozens of products.
  • I got code into Vista (and I assume into Windows 7 and Windows 8 as well).
  • I got to work on the team that built the most ambitious set of templates ever shipped with Visual Studio.
  • I got a very quick, very deep education on JavaScript and CSS.
  • I got to help drive the developer story for an entirely new platform: WinRT, WinJS and Win8.
  • I got to lead two product teams through two PDCs (OK, one PDC and one //build/).
  • I got to give the //build/ keynote launching the Visual Studio 11 tools for Windows 8 with Kieran Mockford, who will forever be my //build/ buddy.
  • I got to see how the sausage is made for SQL Server, WCF, WPF, Silverlight, Windows Phone 7, Windows 8 and a host of others. I am forever changed.

Those and dozens more have all been extraordinary experiences that have made my time at Microsoft extremely valuable. But, like all good things, that time has come to an end.

telerikLogo-web-450x180pxAnd now I’m very much looking forward to my new job at Telerik!

Telerik is an award-winning developer tools, UI controls and content management tools company. They’re well-known in the community not only for their top-notch tools and controls, but also for their sponsorship of community events and their free and open source projects. Telerik is a company that cares about making developer’s lives better and I’m honored that they chose me as part of their management overhead. : )

My division will be responsible for a number of UI control sets — including WinForms, WPF, Silverlight and ASP.NET — as well as a number of tools — including the Just line, OpenAccess ORM and Telerik Reporting. I’m already familiar with Telerik’s famous controls and am now ramping up on the tools (I have been coding with JustCode recently and I like it). My team is responsible for making sure that developers can make the most of existing platforms, knowing that when you’re ready for the next platform, we’ll be there ready for you.

These controls are already great (as is the customer support — holy cow!), so it’ll be my job to help figure out how we should think about new platforms (like Windows 8) and about new directions.

And if you’ve read this far, I’m going to ask for your help.

I’m going to be speaking at user groups and conferences and blogging and in general interacting with the community at lot more than I’ve gotten to do over the last 12 months. As I do that, please let me know what you like about Telerik’s products and what you don’t like, what we should do more of and what new things we should be doing. Telerik already has forums, online customer support, blog posts and voting — you should keep using those. In addition:

Feel free to reach out to me directly about Telerik products.

Of course, I can’t guarantee that I’ll take every idea, but I can guarantee that I’ll consider every one of them that I think will improve the developer experience. I got some really good advice when I first arrived at Microsoft: Make sure that you have an agenda.” The idea is that it’s very easy to get sucked into Microsoft and forget why you’re there or what you care about. My agenda then and now is the same:

Make developers’ lives better.

That’s what I tried to do at Intel, DevelopMentor and Microsoft and that’s what I’m going to try to do at Telerik. Thanks, Telerik for giving me a new home; I can’t wait to be there.