.net

May 13, 2002 .net

Generics for C# and CLR

From Razvan Caciula: You have all here about parametric polymorphism in the CLR using an extended version of C#.
May 10, 2002 .net

Adding Custom Project Item Templates to VS.NET

Adding Custom Project Item Templates to VS.NET

This article describes how to add a custom project item wizard to the Add New Item dialog in Visual Studio .NET. Instead of building a custom implementation of IDTWizard and generating the code ourselves, however, we’re going to leverage Microsoft’s implementation using strategically placed template files and script.

The Sample

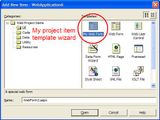
The sample project item template wizard I built to go along with this article is called My Web Form and adds a custom aspx file along with a custom aspx.cs file (the latter being the hard part), as shown below. It also advertises the Web Services DevCon. Enjoy.

NOTE: If you’re going to use this sample in VS.NET 2003, you need to append a .7.1” onto the Wizard = VsWizard.VsWizardEngine line in the .VSZ file located in the CSharpProjectItems directory, other you’ll get a Wizard can’t run error in VS03 (and thanks to Randy Brown for pointing this out).

The Steps

Feel free to follow along:

  1. Under your VS.NET installation folder, find the ProjectItems folder for the type of template item you’d like to add, e.g. VC#\CSharpProjectItems is the directory for C# project items.
     
  2. Create a .vsz file to configure your project item wizard, e.g. here’s a sample CSharpAddMyWebFormWiz.vsz:
    VSWIZARD 7.0
    Wizard=VsWizard.VsWizardEngine
    Param="WIZARD_NAME = CSharpAddMyWebFormWiz"
    Param="WIZARD_UI = FALSE"
    Param="PROJECT_TYPE = CSPROJ"
    Notice that the Wizard value looks like a COM ProgID. It is. Specifically, it’s VS.NET’s built-in VsWizardEngine. That’s so I can skate by using their template expansion engine and their script hosting without having to build it all myself.

    In the part that says WIZARD_NAME, give that the name of your own custom template, e.g. CSharpAddMyWebFormWiz. This name will be used later.

    Click here for more information about .vsz files.
     
  3. The directory structure underneath the ProjectItems folder mimics the folders in the Add New Item dialog. Navigate to the one you like and add a new  .vsdir file to reference the wizard you created in the vsz file above, e.g. here’s a sample mywiz.vsdir for under ProjectItems\WebProjectItems\UI (this is all on a single line):
    ..\..\CSharpAddMyWebFormWiz.vsz|{FAE04EC1-301F-11d3-BF4B-00C04F79EFBC}|
    My Web Form|0|A special web form|{FAE04EC1-301F-11d3-BF4B-00C04F79EFBC}|4534|0|
    WebForm.aspx
    We’ve got several fields here, all separated by old fashioned pipes. The 1st field is the relative path the vsz file we created earlier. The 3rd field is a short description for the Add New Item dialog. A long description (also shown in the dialog) can be provided in the 5th field.

    The 4th field is the sort order, smaller means close to the top. I assume since you’re going to all the trouble to add a custom project item that you think it’s important, so we’ve promoted it all the way.

    Notice also the last field. It shows the general format of the file to be generated and added to the project. The other fields are GUIDs that we copied from the VS.NET CSharpAddWebFormWiz.vsz to leverage” their icon for display.

    Click here for more information about .vsdir files.
     
  4. The mywiz.vsdir file shown above will show your custom template item under the folder you picked, but will not show it at the global level. To show it at the global level, you need to copy your .vsdir file up to the just under LocalProjectItems or WebProjectItems, remembering to update the relative file path, e.g.
    ..\CSharpAddMyWebFormWiz.vsz|{FAE04EC1-…
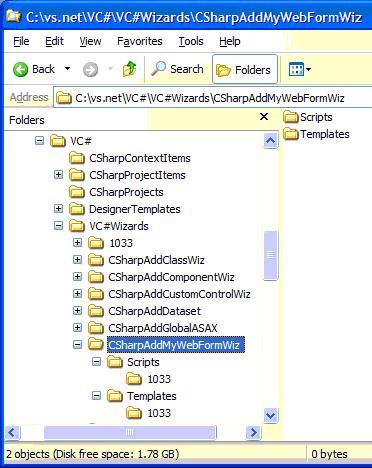
  5. Once you’ve set up the pointers to your new project item template, you will need the template that will form the output of your wizard. This information is placed into a folder under the type of template item you’re building, e.g. VC#\VC#Wizards is where the C# wizards live. The directory structure for your item will look like this:


    The contents of the Template\1033 directory is the manifest for the file to generate for your project item in a file called templates.inf and the file that you would like to use as the template. The template file and the templates.inf file use wizard-provided symbols to example statements like [!output SAFE_CLASS_NAME] into strings like MyClass”. Click here for more information about the template language.

    The following is an example templates.inf file with a single file in it:
    WebForm1.asmx
    By default, all project items have a single file as specified in the Add New Item dialog, which is why we only have a single file in this templates.inf file. When running, the wizard will expect a file named WebForm1.asmx in the Template folder to serve as the template.
     
  6. The templates.inf file turns out to be a convention and is not at all required. The default.js file in the Script\1033 directory of your wizard is what uses the templates.inf file to process each template file. Unfortunately, even a simple default.js file is too complex to reprint here, so I recommend that you find one from a wizard that’s close to what you want to do and copy it. If you just want a single file as determined by the templates.inf file, you’re all set.
     
  7. On the other hand, if you want more, you’re going to be doing some spelunking. For example, I wanted to produce a project item template wizard that output a custom aspx file and the corresponding aspx.cs file. I started by duplicating the CSharpAddWebFormWiz folder, renaming it CSharpAddMyWebFormWiz and following steps 1-6. Then I added another file to the templates.inf file and all heck broke loose.

    First, the default.js file that I duplicated from the Add Wizard Form wizard assumed that it was generating a single file, e.g. WebForm1.aspx, so when I added another file to generate, it reused that file name and VS.NET didn’t like it one bit.

    Second, the IDE itself generates files when certain kinds of files are added to a project, e.g. aspx files. For C# projects, those files live in VC#\DesignerTemplates. Since the aspx.cs file is auto-generated when an aspx file is added to a project, VS.NET didn’t like it when I tried to generate another one right over it.

    Finally, deleting the file in the middle just after the aspx.cs file was generated didn’t work too well either, because default.js tells VS.NET to open the aspx file as soon as it is generated, which causes VS.NET to look for the code behind file, which causes more problems, since we just deleted it.

    So, after digging through the undocumented common functions in VC#\VC#Wizards\1033\common.js that the C# default.js uses to do its work [1], I was able to produce a project item template wizard that produced both an aspx file and an aspx.cs file. See the default.js in the sample for the details.

[1] The VC++ team actually documented the functions in the VC wizard’s common.js. Thanks!

Acknowledgements

Thanks to XP Systems for asking me to help them solve this problem. Also, thanks to Elton Wells for pointing me at some of the docs and the common.js files that the wizards use.

January 6, 2002 .net

VS.NET Fun Facts

After about a month of banging my head on it, Visual Studio.NET has become my favorite IDE of all time. To save you the bruising, I thought I’d post some productivity tricks and traps I’ve learned [1] that make VS.NET useful. If you’ve got your own, send them to me and I’ll post the good ones.

DISCLAIMER: I always leave the standard VS.NET key bindings, i.e. I don’t set it to VC6 style. In general, I just learn the default keystrokes for things instead of changing them. Saves me time when repaving my machines or sitting down at strange machines. If you’ve changed key bindings in your VS.NET, these keystrokes aren’t likely to work, but the tricks will still be useful if you can figure out what the key bindings are.

Download

If you don’t already have VS.NET, run, don’t walk, to MSDN to download a 60-day evaluation of VS.NET Professional.

Tricks

  • The most important thing I’ve done to make VS.NET useful for me is to unpin all of the windows. This gives me tons of room for the source or design view. This, combined with the keystrokes to pull out the windows (below) as I need them, is probably my favorite feature of VS.NET.
     
  • The 2nd most important thing to know is that VS.NET can be invoked from Start->Run using its name devenv” (no quotes). Therefore, to start VS.NET, type Ctrl-Esc, R, devenv, Enter. Much better than digging into the deep Programs menu.
     
  • Make sure to move the Visual Studio .NET Command Prompt” that’s buried deep inside of Start->Programs->Microsoft Visual Studio  .NET->Visual Studio .NET Tools to somewhere more handy, e.g. the Quick Launch toolbar, so that you can get to it easily. You’ll be using the command shell often in your .NET development.
     
  • Let the IDE implement the stubs of an interface function in a class (not a struct):
    1. Type the name of the interface after the name of the class, e.g. class Foo : IDisposable”.
    2. In the Class View (Ctrl-Shift-C), navigate to the class, e.g. Foo, and choose the interface you’d like stubs for under Bases and Interfaces for that class.
    3. In the context menu (Shift-F10), choose Add->Implement Interface.
    4. Bask in the glory of Don Box (who showed me this trick).
       
  • Let the IDE implement the stub of an virtual function override:
    1. In the Class View (Ctrl-Shift-C), navigate to the class, e.g. Foo, and choose the method on the base class you’d like to override under Bases and Interfaces for that class.
    2. In the context menu (Shift-F10), choose Add->Override.
    3. Bask in the glory of me, who found this all by myself. I found this digging through the .VSZ files on my system. It looks like you can add your own context items to the menus, which sounds like fun…
       
  • If you’d like some samples of VS.NET Add-Ins, MS provides some. MSDN Magazine provides an add-in article that you may find useful.
     
  • Likewise, Leo A. Notenboom has written a thorough article about how to write an add-in to VS.NET.
     
  • Also, in A Designable PropertyTree for VS.NET: Russell Morris has built an implementation of the PropertyTree control that you see in VS.NET’s Project Properties dialog. What makes this really cool is that Russell’s control is a great example of what to do to integrate with the VS.NET Forms Designer.
     
  • If you’d like to add to the Solution, Project, Project Item or Context Menu wizards for VC++, VC# or VB.NET, you can. Here’s an example of a project item wizard that produces a custom aspx file and a custom code behind file to go with it.
     
  • While ildasm.exe is very thorough, if you’d like to have a prettier view of the types in an assembly, you can load it into the VS.NET Object Browser. Using the file open dialog, click the drop-down and choose Open With and select the Object Browser. Once it’s loaded, you can unload it by choosing the Remove item from the context menu of the assembly in the Object Browser.
     
  • This isn’t a tip so much as an observation. If you use an #if with a compilation symbol, e.g. DEBUG or TRACE, notice that as you move from configuration to configuration that the editor will gray out the code path that won’t be taken. Is that cool, or what?!?
     
  • Read the online documentation. It’s *so* much more useful than the online documentation of old.
     
  • Brock Allen showed me the 3rd tab (Projects) in the Add References dialog for adding references from one project to the target of another. This works *so* much better than hard-coding .NET references to a specific output folder.
     
  • Ed Stegman pointed out that the Toolbox can be used to store snippets of code. Simply select some and drag-n-drop it on the Toolbox. To paste, drag-n-drop from the Toolbox to your editor. Of course, this is great for duplicating bugs as well. : )
     
  • Ed really likes regions, marked using #region/#endregion compiler directives, too. Now that’s he’s clued me into the keystrokes (below) for expanding and collapsing them, I really like them, too. : )
     
  • Ed also reminded me of the Task List and how anything marked with TODO, HACK or UNDONE will be included in your list of tasks. Andrew Stopford reminded me that you can set up your own keywords via Tools -> Options -> Environment.
     
  • If, on the other hand, you hate the Task List, Kevin Perry suggested the followings steps to turn if off after a build:
    1. Go to Tools -> Options -> Environment -> Project and Solutions.
    2. Uncheck the Show task list window if build finishes with errors” option.
    3. Make sure the Show output window when build starts” option is checked.
    4. Now go and close the task list window and it’s gone for good!
       
  • Several folks have sent along macros that are life savers to them. If you’d like to do that, I’m happy to post them here along with your name and a brief description. Please send attached files instead of inline text, however. Thanks!
  • Drew Marsh pointed out that Ctrl-S works in any of the output windows, e.g. build, debug, etc, to save the contents to a file.
     

  • It’s cool to have MS folk reading this list. Kevin Perry sent me to procedure to bypass the Attach to Process” dialog that asks what kind of debugger you’d like to pick, i.e. CLR, T-SQL, Native and/or Script, when you click on the Attach… button in the Debug Processes dialog. Ctrl-clicking on Attach… will give you the Native debugger without asking.
     

  • My good friend Tim Ewald reminded me that one of the coolest features of VS.NET is that the solution explorer is really just a view of your actual project folders in the shell. This is especially useful if you choose Show All Files, so that you can add files to your project that are already in your project directory simply by using the context menu. If you’d like to add a file that isn’t in your project, you can do so by opening the file and choosing Move <file> into Project” from the context menu. This is a poorly named item, however, as it actually links to the existing file outside the project instead of moving it in the file system (although the linking is the correct behavior).
     

  • To speed the IDE start-up time, you want to avoid the browser being loaded. To do that, from the Start Page, choose My Profile and set At Startup to Show empty environment. Also, close the Dynamic Help window and the Start Page. Now IE will only be loaded on demand.
     

  • If you like the tabs showing the various files you have open, but miss the ability to show multiple files at the same time, right-click on one of the tabs and choose New Horizontal/Vertical Tab Group. Both tab groups will show simultaneously and you can move tabs (and therefore the window that the tab represents) between tab groups by right-clicking on the tab.
     

  • Maria Abreu points out that VS.NET, by default, neglects to colorize strings (an omission, IMO). You can colorize them via Tools->Options->Fonts and Colors and it really helps. Thanks, Maria.
     

  • Graeme Foster posted this tip on the DOTNET mailing list for getting VS.NET to copy the application .config file during the build: simply name the file app.config and put it in the main project directory. At build time, VS.NET will copy the file into the output directory with the build output.
     

  • Dominick Baier reminded me that by typing ///” (no quotes) above the declaration of a method or property, the C# editor will give you the template for the C# XML documentation tags with all parameters and return value. The IDE will compose these comments into (fairly ugly) HTML-based documentation for your classes using the Tools->Build Comment Web Pages menu item. A much nicer set of documentation from these comments can be generated by NDoc.
     

  • Kunal Cheda pointed out that if you’ve got multiple things you’d like to start when running or debugging a solution, you can do so at Solution Explorer->Solution Properties->Startup Project->Multiple Startup Projects. *Very* handy for client-server testing.
     

  • Nick Hodapp passed along this tip on how to exclude included files that don’t change from VC++ dependency checking:
     

    1. Add header file directory names (using full, absolute paths) one per line, to SYSINCL.dat.

    2. Exit the development environment.

    3. Restart the development environment.

    4. Click Rebuild for changes to take effect, noticing a reduction in build times.
       

  • Shawn Van Ness thinks that the clipboard ring is so cool, it should be back-propped into all of Windows”: Using Ctrl+Shift+V as an alternative to the usual Ctrl+V paste command, will cycle” through the last dozen or so bits of text you’ve copied onto the clipboard. This simple user scenario demonstrates:
     

    1. Copy #if DEBUG onto the clipboard.

    2. A few lines below, copy #else” onto the clipboard.

    3. A few lines further below, copy #endif” onto the clipboard.

    4. Scroll down many hundreds of lines… or open a different file, etc.

    5. Ctrl+Shift+V to paste #endif”.

    6. Ctrl+Shift+V, Ctrl+Shift+V to paste #else”.

    7. Ctrl+Shift+V, Ctrl+Shift+V, Ctrl+Shift+V to paste #if DEBUG.
       

  • Scott Hanselman pointed out that you can set the font size to VS.NET from the command line using the /fs argument, e.g. devenv.exe /fs 14”. This is great for presenters!
     

  • For the complete list of key bindings, MS provides a Keybindings Table Add-In. Here it is already compiled. Just drop it anywhere, register it as a COM server and the next time you start VS, you’ll have a KeyMap command in the Help menu.
     

  • Russell Sinclair has provided his favorite key bindings in an Excel spreadsheet that prints and folds nicely for keeping it handy.
     

  • Here are my favorite key bindings:
     
    Keys Binding
    F8/Shift-F8 Navigate compilation errors
    Ctrl-D Move to mini-buffer
    Ctrl-Shift-G in mini-buffer or
    Ctrl-O in mini-buffer
    Open file name in mini-buffer (Ctrl-O seems to open stuff Ctrl-Shift-G does not)
    > command” in mini-buffer Execute command
    Ctrl+/ Move to mini-buffer, typing the leading > for you
    Ctrl-Alt-A Open the command window
    Ctrl-PageUp in HTML Design View Open source view
    Ctrl-PageDown in HTML Source View Open design view
    F7 in Form Design View Open source view
    Shift-F7 in Form Source View Open design view
    Ctrl-Alt-L Solution Explorer
    F4 or Alt-Enter Properties of selected item
    Ctrl-Shift-B Build
    F5 Debug
    Ctrl-F5 Run, but not debug
    Ctrl-Alt-J Object Browser
    Ctrl-Shift-C Class View
    Ctrl-Space when typing a symbol Complete the symbol you’re currently typing or give you a choice of possibilities
    Ctrl-Space when entering arguments Show the function prototype
    -” (no quotes) as the name of a menu item Menu item becomes a separator
    Ctrl-K Ctrl-F Reformat selection
    } Reformat scope being closed
    Ctrl-K Ctrl-C Comment out selected lines
    Ctrl-K Ctrl-U Uncomment selected lines
    Ctrl-} Match braces, brackets or compiler directives
    Shift-Ctrl-} Select match between braces, brackets or compiler directives
    Ctrl-L or Shift-Del or
    Ctrl-X w/ no selection
    Delete entire line
    Ctrl-Del Delete next word”
    Alt-F6 Next visible pane (not for use with all windows unpinned)
    Ctrl-Shift-F12 Jumps to next *whatever*, depending on what’s active, e.g. next find result, next task, next error, etc.
    Ctrl-“-”/Ctrl-Shift-“-” (no quotes) Jumps to last/next place you worked
    Ctrl-C in the Class View Copies fully qualified name to the Clipboard
    Ctrl-M Ctrl-M Collapse or expand a region or outlined block (as marked by the [+] and [-] on the left hand side of the editor).
    Ctrl-M Ctrl-O Collapse everything in the current file
    Ctrl-M Ctrl-L Expand everything in the current file
    F12 Jump to the current symbol’s declaration
    Ctrl-G, line #, Enter or
    Ctrl-D, line #, Ctrl-G
    Jump to line
    Ctrl-I/Ctrl-Shift-I + string Incremental search for string
    Ctrl-R+Ctrl-R Turn on/off word wrap
    Ctrl+Up/Down Arrow Scroll window up/down without moving the cursor away from the current line
    Shift+Alt+Arrows
    (Alt+Mouse works, too)
    Column selection (include of line selection)

Traps

  • VS.NET’s Copy Project uses FrontPage Extensions to publish a web site from a local testing machine to the deployment machine. This is virtually important if you don’t want to hack on your live web sites. However, Copy Project sends everything every time instead of sending the deltas, so it’s pretty worthless as far as I can tell. Instead, Brad Wilson clued me into the FrontPage Publish Web command, which only publishes deltas.
     
  • The command window (or > in the mini-buffer) seems really cool, but I don’t know any good commands to type. Do you?
     
    • Joe Bauer points out that you can, of course, use the command window to print fields or call methods using the ?, e.g. > ? objMyClass.GetCount()”.
    • Richard Birkby pointed out the shell” command, which seems a bit unwieldy for me, but you may like it. >shell /?” in the mini-buffer will show usage (now that’s cool!).
    • Drew Marsh points out that the command window (or the mini-buffer with a > prefix) allows you to execute any command provided by the shell, add-ins, or macros. Anything you don’t bind to a key combination or toolbar button, you can go into the command window to execute. Also, it supports auto-completion for those of us with poor memories.
    • Richard Broida pointed out the use of the ?” command to print variables at debug time.
    • John Lam showed me where the docs are for the pre-defined command aliases. He also points out that you can create your own aliases, but you need cool commands first before you can do that. : )
    • Ramakrishna Vavilala recommends a cool alias >alias ! shell /command cmd /c” which reduces the syntax of the shell command considerably and sends the command output to the Command window.

    • Don Box pointed me at two commands that forces me to learn the keyboard shortcut to put focus in the command window (Ctrl-Alt-A):
       

      • >open <partial path>” will give Intellisense on the file system, e.g. >open c:".
         

      • >File.NewFile <file name>” will open a new file with the appropriate name and syntax highlighting, e.g. >open foo.cs”. This is even handier when you alias new” to File.NewFile, e.g. >alias new File.NewFile”, because you can just do this >new foo.cs”.
         

  • As far as I can tell, there is no way in a C# project to run custom pre or post-build commands, either on a project or a file level. If the VC++ wizards still had a Utility project, that could be used, but the closest I’ve seen in VS.NET is a Makefile project. Anyone have ideas on this one?
     
    • Several folks have recommended a VS.NET Add-In Sample that is supposed to provide this capability.
    • Kevin Perry showed me where the UI scrambler put the Utility project in this version of the IDE:
      1. Run the makefile appwizard to create a makefile project.
      2. Bring up the project properties for the project and look at the general page
      3. Select Utility” in the Configuration Type” property drop down.
      4. Click Apply.
        POOF! Instant Utility project.
        BTW: C++ Static Library projects can also double as utility projects in a pinch.
         
  • As cute as the Add Reference menu item is on a project’s context menu, your going to have to avoid Add Reference for COM servers and build the references by hand if you sign your assemblies (which you should always do). Apparently a signed assembly is not allowed to reference an assembly that’s not signed and the Add Reference menu item doesn’t sign the generated assembly. All Add Reference does is the moral equivalent of the tlbimp command line tool anyway, so get used to calling it yourself using the /keyfile command line argument. If you import COM Controls, e.g. the WebBrowser control, you’ll need to use aximp instead of tlbimp, but the /keyfile argument is the same.

    However, Jerry Dennany points out that you can have VS.NET itself sign your interop assemblies by going to the Project Properties, and under Common Properties / General there will be a section for wrapper Assembly for ActiveX / COM Objects.” You may place your path to the Key File here, and everything still works from the IDE.
     
  • There are no wizards for standard SDI, MDI or Explorer-style applications in WinForms as there were in VC++ for MFC applications. However, the wizard stuff is there, although it’s obscure, so maybe I’ll build one. I’ve certainly done my share of that kind of work…
     
  • Likewise, there is no built in support for MFC-style document handling, separation of data and view, command line processing or command UI handling. I’ve done my share of that kind of work, too, and I *will* be building that stuff. Anyone want to volunteer to help?
     
  • I don’t seem to be able to get a custom control on the toolbox unless it’s part of a separate assembly. What if I have a custom control in my application? Can I make it show up on the toolbox somehow?
     
    • Bob Beauchemin pointed out that I can customize the toolbox and point it at a built version of my EXE, which sounds kind of awkward, but works.
       
  • I can’t tell. Is everything being recompiled every time I build, regardless of whether the source has changed or not?
     
    • Drew Marsh pointed out that the Incremental Build option in a C# project will decide whether you rebuild only if it is changed or not.
       
  • If a file is thought of” internally by the IDE as one text, e.g. Text, and you try to save it as another type, e.g. XML, if you’re not very careful the save dialog will append the extension of the type it thinks it is, e.g.  .txt. To enforce the extension you want, put double quotes around the file name, e.g. foo.xml”.
     
  • Neither BeginInvoke nor EndInvoke is shown when calling methods on a delegate in C#, even though they do in VB.NET. This just seems wrong…
     
  • Docs on the built-in VsWizardEngine that VS.NET provides would be nice.
     
    • Jon Flanders says that they’re documented as part of Enterprise Templates.
       
  • By default, adding a new project to an existing solution wants to put the new project in a peer directory instead of in a sub-directory. This seems strange if you’re trying to keep these things together (which, presumably, you are if you’re grouping multiple projects into a single solution). Certainly, I’ve seen users dig through several peer directories looking for the solution file. I put sub-projects into sub-directories by hand, but it would be nice if the IDE did this automatically.
     
  • Cleaning a project of it’s output files doesn’t actually work for C# or VB.NET projects (although the UI shows it as an option, as does the command line). Tomas Restrepo has provided an add-in that provides the missing Clean functionality, along with a rant on what problems he had building the add-in.
     
  • In spite of CodeWright and every other 3rd party editor supporting it for years, VS still doesn’t support keyword expansion, e.g. expanding if( into if( | )\n{\n}”, so I use Dexter, from NilgiriHouse. I don’t have to change my typing habits at all, but I get tons o’ text for free.
     
  • The macro recorder is pretty stunted. For example, if I want a macro to switch between some editor settings, e.g. my normal code formatting style and my prose code formatting style, and I record a macro to watch me change the settings, all the recorded macro does is record that the dialog was shown, not what settings I changed. What a let down…

[1] I’ve learned a ton of these tricks and traps from my fellow DevelopMentor instructors, my students and the .NET mailing list, all of which I can heartily recommend.

May 18, 2001 .net

Generics for C# and .NET CLR

This is a small site dedicated to the .NET generics research, including a version of the whitepaper describing their research updated as of 5/2/02.