“MonoLOGO provides access to all .NET constructs from within LOGO. Its goal to be 99% compliant with Berkeley LOGO (there are a few internal UCBLogo directives that won’t make sense to support). Eventually I hope to extend the LOGO syntax to support most if not all of .NET’s constructs.”
“Demeanor for .NET Enterprise Edition provides the most sophisticated obfuscation and optimization available for your .NET applications. Demeanor for .NET performs three categories of obfuscation - symbol obfuscation, metadata obfuscation and control flow obfuscation. All forms of obfuscation are lossy. In other words, the process throws away information making it unavailable for a decompiler.”
This article describes how to implement a VB.NET version of
Chris Sells’s Project Item Template sample for C#. As with Chris’s sample,
we leverage the VB.NET wizard infrastructure using various template files and script.
There is a fair degree of crossover between the two approaches. Accordingly, I quote/paraphrase
Chris where required.
The Sample
The VB.NET Project Item Template Wizard sample
used in this article is called MyWebForm. It adds a custom WebForm and Webform codebehind
class, over-riding the default wizard behavior of dynamically creating a codebehind
class for you. Chris’ sample was the inspiration for the VB.NET version, and it
implements the same codebehind over-ride logic by leveraging the Microsoft VB.NET
wizard infrastructure.
NOTE: If you’re going to use this sample in VS.NET 2003, you need to append a
“.7.1” onto the Wizard = VsWizard.VsWizardEngine line in the .VSZ file located in
the VBProjectItems directory, other you’ll get a Wizard can’t run error in VS03
(and thanks to Randy Brown for pointing this out).
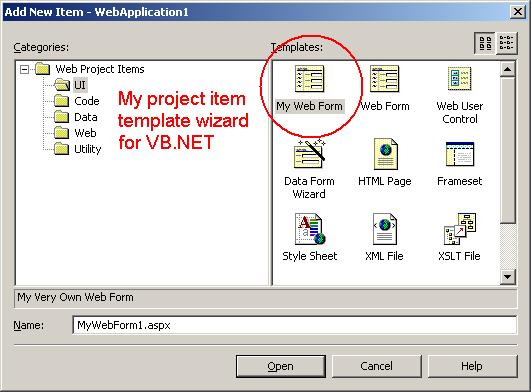
The following diagram is what we’ll hopefully end up with:
How You Do It
Go to the VB7\VBProjectItems directory beneath your Microsoft Visual Studio.NET
install folder. This is where you’ll add all your wizard files.
Create a .vsz file to configure your project item wizard. There are a bunch of others
you can copy from, or you can create your own. The sample creates MyWebForm.vsz,
and contains the following text:
As with the C# sample, we’re leveraging VS.NET’s built-in COM-based VsWizardEngine
to do all the work for us. Also, the wizard basically uses the WIZARD_NAME
parameter to map to the \VB7\VBWizards\ directory that contains the template and script
files used to create your project item.
See VS.NET’s
MSDN
for more information about .vsz files. And take a look
here
for a list of parameters you can use in the .vsz file.
You need to add a .vsdir file to whichever of the subfolders beneath the \VB7\VBProjectItems
folder you’d like to be able to use your wizard from. Once you do this, your project
item wizard will automagically appear in the “Add New Item” dialog. The MyWebForm
sample adds a MyWebForm.vsdir to both the \WebProjectItems and \WebProjectItems\UI
folders.
\WebProjectItems\MyWebForm.vsdir contains one line:
..\MyWebForm.vsz| |My Web Form|1|My Very Own Web Form|{164B10B9-B200-11D0-8C61-00A0C91E29D5}
  |4533|0|MyWebForm.aspx
\WebProjectItems\WebProjectItems\UI\MyWebForm.vsdir contains the same line,
apart from an update to the relative file path to MyWebForm.vsz:
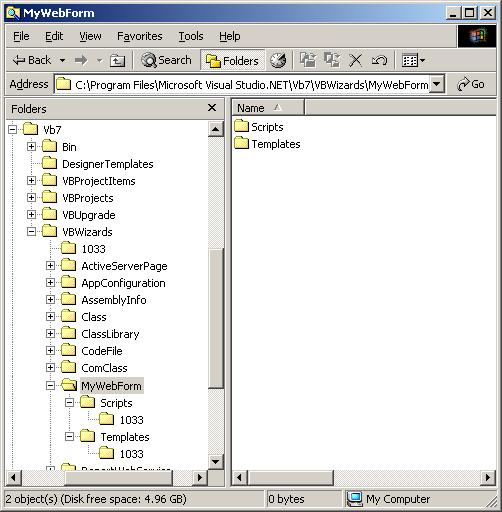
Navigate to the \VB7\VBWizards folder, which contains the VB.NET wizards. Each wizard
is stored in a group of subfolders that make a home for your templates and script.
The sample creates the MyWebForm folder:
MyWebForm uses two template files: MyWebForm.aspx and MyWebForm.aspx.vb, which reside
in \Templates\1033. The script file, default.js, hangs out in\ Scripts\1033.
Note: You don’t need a MyWebForm.aspx.vb codebehind template. I started this
exercise by copying the VB.NET default WebForm wizard template and script, changing
the relevant names to MyWebForm. The \Template\1033 directory only contained the
MyWebForm.aspx file. When the wizard runs, it automatically generates the codebehind
class from a default codebehind template file, NewWebFormCode.vb, stored in the
\VB7\DesignerTemplates folder.
We, however, do want to use a custom codebehind. The key to making this work lies
in extending the default WebForm script to delete the auto-generated codebehind
class and replace it with our own, using the same fundamental logic as the C# sample.
When it comes down to it, it’s pretty simple: MyWebForm leverages functionality
contained in \VB7\VBWizards\1033\common.js to make it happen. Take a look at the
sample’s default.js file to see how.
Acknowledgements
Thanks to Chris Sells for the C# solution,
and the chance.
“Have you ever wished you could explore the behavior of a component or some code without having to write any code? To watch events occur on any object and examine the history of events? To quickly try something and see how it affects the component? To look at the visual behavior of a component as you adjust not only its properties, but execute its methods? If so the nogoop .NET Component Inspector is the tool you have been seeking.”
“I’d like to welcome you to the inaugural article of my new MSDN Online column. From the title of this column, you can probably tell two things right off. It’s about Windows Forms, and it’s a technology I like quite a bit. Of course, as with any technology, Windows Forms has its good points and its ‘opportunities for improvement.’ In this column, I’ll explore the various ins and outs of Microsoft .NET as it relates to building stand-alone applications, as well as the client side of client-server and n-tier applications.”