REPL for the Rosyln CTP 10/2011

I don’t know what it is, but I’ve long been fascinated with using the C# syntax as a command line execution environment. It could be that PowerShell doesn’t do it for me (I’ve seriously tried half a dozen times or more). It could be that while LINQPad comes really close, I still don’t have enough control over the parsing to really make it work for my day-to-day command line activities. Or it may be that my friend Tim Ewald has always challenged csells to sell C shells by the sea shore.
Roslyn REPL
Whatever it is, I decided to spend my holiday time futzing with the Roslyn 2011 CTP, which is a set of technologies from Microsoft that gives you an API over your C# and VB.NET code.
Why do I care? Well, there are all kinds of cool code analysis and refactoring tools I could build with it and I know some folks are doing just that. In fact, at the BUILD conference, Anders showed off a “Paste as VB” command built with Roslyn that would translate C# to VB slick as you please.
For me, however, the first thing I wanted was a C# REPL environment (Read-Evaluate-Print-Loop). Of course, Roslyn ships out of the box with a REPL tool that you can get to with the View | Other Windows | C# Interactive Window inside Visual Studio 2010. In that code, you can evaluate code like the following:
> 1+1
2

> void SayHi() { Console.WriteLine("hi"); }

> SayHi();

hi
Just like modern dynamic languages, as you type your C# and press Enter, it’s executed immediately, even allowing you to drop things like semi-colons or even calls to WriteLine to get output (notice the first “1+1” expression). This is a wonderful environment in which to experiment with C# interactively, but just like LINQPad, it was a closed environment; the source was not provided!
The Roslyn team does provide a great number of wonderful samples (check the “Microsoft Codename Roslyn CTP - October 2011” folder in your Documents folder after installation). One in particular, called BadPainting, provides a text box for inputting C# that’s executed to add elements to a painting.
But that wasn’t enough for me; I wanted at least a Console-based command line REPL like the cool Python, JavaScript and Ruby kids have. And so, with the help of the Roslyn team (it pays to have friends in low places), I built one:
Building it (after installing Visual Studio 2010, Visual Studio 2010 SP1, the Visual Studio 2010 SDK and the Roslyn CTP) and running it lets you do the same things that the VS REPL gives you:
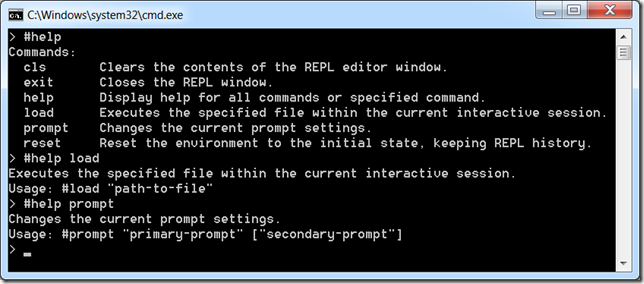
In implementing my little RoslynRepl tool, I tried to stay as faithful to the VS REPL as possible, including the help implementation:
If you’re familiar with the VS REPL commands, you’ll notice that I’ve trimmed the Console version a little as appropriate, most notably the #prompt command, which only has “inline” mode (there is no “margin” in a Console window). Other than that, I’ve built the Console version of REPL for Roslyn such that it works just exactly like the one documented in the Roslyn Walkthrough: Executing Code in the Interactive Window.
Building a REPL for any language is, at you might imagine, a 4-step process:
- Read input from the user
- Evaluate the input
- Print the results
- Loop around to do it again until told otherwise
Read
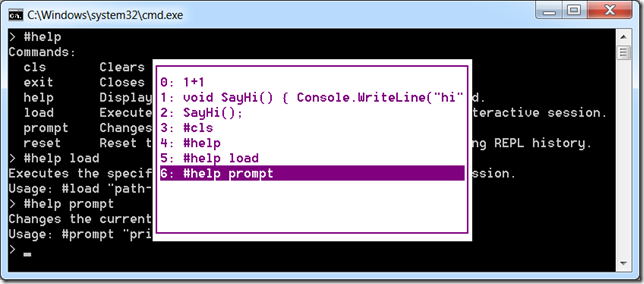
Step 1 is a simple Console.ReadLine. Further, the wonder and beauty of a Windows Console application is that you get complete Up/Down Arrow history, line editing and even obscure commands like F7, which brings up a list of commands in the history:
The reading part of our REPL is easy and has nothing to do with Roslyn. It’s evaluation where things get interesting.
Eval
Before we can start evaluating commands, we have to initialize the scripting engine and set up a session so that as we build up context over time, e.g. defining variables and functions, that context is available to future lines of script:
using Roslyn.Compilers;
using Roslyn.Compilers.CSharp;
using Roslyn.Compilers.Common;
using Roslyn.Scripting;
using Roslyn.Scripting.CSharp;
...
// Initialize the engine
string[] defaultReferences = new string[] { "System", ... };
string[] defaultNamespaces = new string[] { "System", ... };
CommonScriptEngine engine = new ScriptEngine(defaultReferences, defaultNamespaces);
// HACK: work around a known issue where namespaces aren't visible inside functions
foreach (string nm in defaultNamespaces) {
  engine.Execute("using " + nm + ";", session);
}

Session session = Session.Create();
Here we’re creating a ScriptEngine object from the Roslyn.Scripting.CSharp namespace, although I’m assigning it to the base CommonScriptEngine class which can hold a script engine of any language. As part of construction, I pass in the same set of assembly references and namespaces that a default Console application has out of the box and that the VS REPL uses as well. There’s also a small hack to fix a known issue where namespaces aren’t visible during function definitions, but I expect that will be unnecessary in future drops of Roslyn.
Once I’ve got the engine to do the parsing and executing, I creating a Session object to keep context. Now we’re all set to read a line of input and evaluate it:
ParseOptions interactiveOptions =
  new ParseOptions(kind: SourceCodeKind.Interactive,
                   languageVersion: LanguageVersion.CSharp6);
...
while (true) {
  Console.Write("> ");
  var input = new StringBuilder();

  while (true) {
    string line = Console.ReadLine();
    if (string.IsNullOrWhiteSpace(line)) { continue; }

    // Handle #commands
    ...

    // Handle C# (include #define and other directives)
    input.AppendLine(line);

    // Check for complete submission
    if (Syntax.IsCompleteSubmission(
          SyntaxTree.ParseCompilationUnit(
            input.ToString(), options: interactiveOptions))) {
      break;
    }
    Console.Write(". ");
  }

  Execute(input.ToString());
}
The only thing we’re doing that’s at all fancy here is collecting input over multiple lines. This allows you to enter commands over multiple lines:
The IsCompleteSubmission function is the thing that checks whether the script engine will have enough to figure out what the user meant or whether you need to collect more. We do this with a ParseOptions object optimized for “interactive” mode, as opposed to “script” mode (reading scripts from files) or “regular” mode (reading fully formed source code from files). The “interactive” mode lets us do things like “1+1” or “x” where “x” is some known identifier without requiring a call to Console.WriteLine or even a trailing semi-colon, which seems like the right thing to do in a REPL program.
Once we have a complete command, single or multi-line, we can execute it:
public void Execute(string s) {
  try {
    Submission<object> submission = engine.CompileSubmission<object>(s, session);
    object result = submission.Execute();
    bool hasValue;
    ITypeSymbol resultType = submission.Compilation.GetSubmissionResultType(out hasValue);

    // Print the results
    ...
  }
  catch (CompilationErrorException e) {
    Error(e.Diagnostics.Select(d => d.ToString()).ToArray());
  }
  catch (Exception e) {
    Error(e.ToString());
  }
}
Execution is a matter of creating a “submission,” which is a unit of work done by the engine against the session. There are helper methods that make this easier, but we care about the output details so that we can implement our REPL session.
Printing the output depends on the type of a result we get back:
ObjectFormatter formatter =...
new ObjectFormatter(maxLineLength: Console.BufferWidth, memberIndentation: " ");
Submission<object> submission = engine.CompileSubmission<object>(s, session); object result = submission.Execute(); bool hasValue; ITypeSymbol resultType =
submission.Compilation.GetSubmissionResultType(out hasValue); // Print the results if (hasValue) { if (resultType != null && resultType.SpecialType == SpecialType.System_Void) { Console.WriteLine(formatter.VoidDisplayString); } else { Console.WriteLine(formatter.FormatObject(result)); } }
As part of the result output, we’re leaning on an instance of an “object formatter” which can trim things for us to the appropriate length and, if necessary, indent multi-line object output.
In the case that there’s an error, we grab the exception information and turn it red:
void Error(params string[] errors) {
  var oldColor = Console.ForegroundColor;
  Console.ForegroundColor = ConsoleColor.Red;
  WriteLine(errors);
  Console.ForegroundColor = oldColor;
}
public void Write(params object[] objects) {
  foreach (var o in objects) { Console.Write(o.ToString()); }
}

void WriteLine(params object[] objects) {
  Write(objects);
  Write("\r\n");
}
Loop
And then we do it all over again until the program is stopped with the #exit command (Ctrl+Z, Enter works, too).
Where Are We?
Executing lines of C# code, the hardest part of building a C# REPL, has become incredibly easy with Roslyn. The engine does the parsing, the session keeps the context and the submission gives you extra information about the results. To learn more about scripting in Roslyn, I recommend the following resources:
- Roslyn on MSDN
- The REPL forum for Roslyn
- C# as a Scripting Language in Your .NET Applications Using Roslyn, Anoop Madhusudanan, codeproject.com, 10/24/2011
Now I’m off to add Intellisense support. Wish me luck!


