Adding Custom VB.NET Project Item Template Wizards to VS.NET
by Michael Weinhardt
This article describes how to implement a VB.NET version of
Chris Sells's Project Item Template sample for C#. As with Chris’s sample,
we leverage the VB.NET wizard infrastructure using various template files and script.
There is a fair degree of crossover between the two approaches. Accordingly, I quote/paraphrase
Chris where required.
The Sample
The VB.NET Project Item Template Wizard sample
used in this article is called MyWebForm. It adds a custom WebForm and Webform codebehind
class, over-riding the default wizard behavior of dynamically creating a codebehind
class for you. Chris’ sample was the inspiration for the VB.NET version, and it
implements the same codebehind over-ride logic by leveraging the Microsoft VB.NET
wizard infrastructure.
NOTE: If you're going to use this sample in VS.NET 2003, you need to append a
“.7.1” onto the Wizard = VsWizard.VsWizardEngine line in the .VSZ file located in
the VBProjectItems directory, other you’ll get a Wizard can’t run error in VS03
(and thanks to Randy Brown for pointing this out).
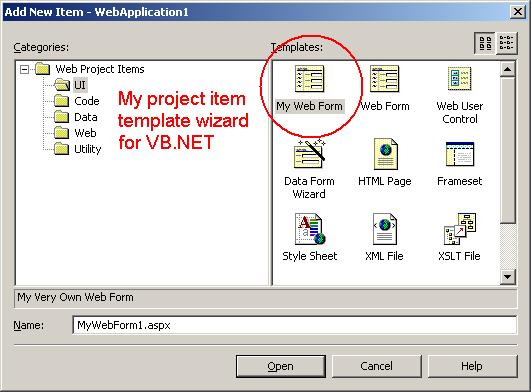
The following diagram is what we’ll hopefully end up with:
How You Do It
- Go to the VB7\VBProjectItems directory beneath your Microsoft Visual Studio.NET
install folder. This is where you’ll add all your wizard files.
- Create a .vsz file to configure your project item wizard. There are a bunch of others
you can copy from, or you can create your own. The sample creates MyWebForm.vsz,
and contains the following text:
VSWIZARD 7.0
Wizard=VsWizard.VsWizardEngine
Param="WIZARD_NAME = MyWebForm"
Param="WIZARD_UI = FALSE"
Param="PROJECT_TYPE = VBPROJ"
As with the C# sample, we’re leveraging VS.NET’s built-in COM-based VsWizardEngine
to do all the work for us. Also, the wizard basically uses the WIZARD_NAME
parameter to map to the \VB7\VBWizards\ directory that contains the template and script
files used to create your project item.
See VS.NET’s
MSDN
for more information about .vsz files. And take a look
here
for a list of parameters you can use in the .vsz file.
- You need to add a .vsdir file to whichever of the subfolders beneath the \VB7\VBProjectItems
folder you’d like to be able to use your wizard from. Once you do this, your project
item wizard will automagically appear in the “Add New Item” dialog. The MyWebForm
sample adds a MyWebForm.vsdir to both the \WebProjectItems and \WebProjectItems\UI
folders.
\WebProjectItems\MyWebForm.vsdir contains one line:
..\MyWebForm.vsz| |My Web Form|1|My Very Own Web Form|{164B10B9-B200-11D0-8C61-00A0C91E29D5}
  |4533|0|MyWebForm.aspx
\WebProjectItems\WebProjectItems\UI\MyWebForm.vsdir contains the same line,
apart from an update to the relative file path to MyWebForm.vsz:
..\..\MyWebForm.vsz | ...
Check out Chris's article or VS.NET’s MSDN
for a discussion of the different fields declared in .vsdir files.
The DLLPath and IconResourceID parameters differ from the C# sample since it appears
the underlying implementation differs.
- At this point, VS.NET can display your Wizard in the “Add New Item” dialog (.vsdir
files), and you’ve told VS.NET what wizard to call, passing it the information it
needs through a group of parameters (.vsz file). What you’ve got left to do is to
create the templates that the wizard will use, and implement a small script that
does the work of converting those templates into the MyWebForm.aspx and MyWebForm.aspx.vb
(codebehind) files that are finally added to your project. As with C#, the wizard
engine converts symbols like [! Output SAFE_CLASS_NAME] into strings like
NoClass. The sample demonstrates
the use of symbols in both the MyWebForm.aspx and MyWebForm.aspx.vb files.
Navigate to the \VB7\VBWizards folder, which contains the VB.NET wizards. Each wizard
is stored in a group of subfolders that make a home for your templates and script.
The sample creates the MyWebForm folder:
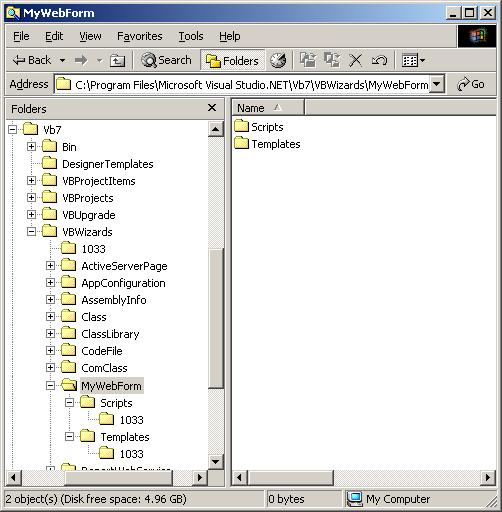
MyWebForm uses two template files: MyWebForm.aspx and MyWebForm.aspx.vb, which reside
in \Templates\1033. The script file, default.js, hangs out in\ Scripts\1033.
Note: You don’t need a MyWebForm.aspx.vb codebehind template. I started this
exercise by copying the VB.NET default WebForm wizard template and script, changing
the relevant names to MyWebForm. The \Template\1033 directory only contained the
MyWebForm.aspx file. When the wizard runs, it automatically generates the codebehind
class from a default codebehind template file, NewWebFormCode.vb, stored in the
\VB7\DesignerTemplates folder.
- We, however, do want to use a custom codebehind. The key to making this work lies
in extending the default WebForm script to delete the auto-generated codebehind
class and replace it with our own, using the same fundamental logic as the C# sample.
When it comes down to it, it’s pretty simple: MyWebForm leverages functionality
contained in \VB7\VBWizards\1033\common.js to make it happen. Take a look at the
sample’s default.js file to see how.
Acknowledgements
Thanks to Chris Sells for the C# solution,
and the chance.